
Nexus 1.1.1 Version
Panzura TechPub Copyright © Panzura, LLC. 2026 | panzura.com
Table of Contents
- Home ..... 4
- 1.1.1 ..... 5 2.1 Panzura Nexus Overview ..... 5 2.2 Compatibility and Support in Panzura Nexus ..... 8 2.2.1 Scanning and Scaling Panzura Nexus ..... 9 2.3 Features in Panzura Nexus ..... 10 2.3.1 What's New? ..... 10 2.3.2 Key Features ..... 10 2.4 Panzura Nexus Checklist ..... 14 2.4.1 Detailed Prerequisites Overview ..... 15 2.4.2 Upload Nexus VHDs to Azure Private Marketplace ..... 16 2.4.3 Share an AWS AMI image ..... 21 2.4.4 Enabling CloudFS for Nexus ..... 23 2.5 Panzura Nexus Installation ..... 24 2.5.1 Installing Panzura Nexus on Microsoft Azure ..... 24 2.5.2 Installing Panzura Nexus on Microsoft Hyper-V ..... 24 2.5.3 Installing Panzura Nexus on AWS ..... 25 2.5.4 Installing Panzura Nexus on VMware ..... 25 2.5.5 Installing Panzura Nexus on KVM ..... 26 2.5.6 Accessing Panzura Nexus setup wizard ..... 26 2.5.7 Panzura Nexus Web UI Walkthrough ..... 27 2.6 Panzura Nexus Dashboard ..... 30 2.6.1 System Overview ..... 30 2.6.2 Data Insights ..... 34 2.7 Getting Started with Panzura Nexus Configuration ..... 37 2.8 Panzura Nexus Plugin Configuration ..... 38 2.8.1 Configure Storage Systems ..... 38 2.8.2 Configure AI Systems ..... 38 2.8.3 Configure Identity Management ..... 39 2.8.4 Configure Rules ..... 39 2.8.5 Configure Policies ..... 40 2.9 Panzura Nexus Statistics ..... 44 2.9.1 Jobs ..... 44 2.9.2 Reports ..... 45
2.10 Panzura Nexus Configuration ..... 48 2.10.1 Settings ..... 48 2.10.2 Register the application in Microsoft Entra ID ..... 52 2.10.3 Agents ..... 53 2.10.4 Support for Comprehensive Indexing and Search for Large Files ..... 72 2.11 System Operations ..... 73 2.11.1 Download Logs ..... 73 2.11.2 Backup & Restore ..... 75 2.12 System Management Audits ..... 81 2.13 User Profiles in Panzura Nexus ..... 82 2.13.1 User Profile ..... 82 2.14 Alerts in Panzura Nexus ..... 83 2.14.1 Alerts ..... 83 2.15 Glossary ..... 85
1. Home
Welcome to Panzura Nexus Documentation! We're excited to have you with us! This guide has been prepared to help you navigate the product with ease, offering clear instructions and practical insights. Your engagement is highly valued, and we look forward to supporting your journey with us.
Let's get started!
2.1 Panzura Nexus Overview
Organizations using CloudFS manage massive volumes of unstructured file data, making it difficult to search, analyze, and derive insights, as AI tools like Microsoft Copilot cannot securely access this information. Panzura Nexus eliminates this gap by seamlessly integrating CloudFS with Microsoft Copilot to deliver secure, AI-powered search and data insights.
Nexus selectively ingests file content, metadata, and change events from CloudFS into Copilot's AI ecosystem while maintaining all existing enterprise access controls and permissions. This ensures that data remains both searchable and secure. With this integration, CloudFS content becomes fully AI-searchable, enabling users to ask meaningful questions, uncover insights, and accelerate everyday tasks through a natural, conversational interface powered by Microsoft Copilot.
Key Capabilities:
| Key Features | Description |
|---|---|
| Native CloudFS Integration | Seamlessly integrates with CloudFS to ingest data, metadata, |
| and security attributes for AI-powered insights. | |
| Selective Data Ingestion | Connects to Microsoft Copilot via Microsoft Graph |
| Connector, ingests file content and metadata. Handles file | |
| updates, ACL changes, renames, and directory structure | |
| changes | |
| Access Control & Security | Policies enforce strict Access Control over the data ingested |
| into the AI system. This ensures that users, even during AI | |
| conversations, are prohibited from accessing CloudFS files | |
| for which they do not have the required permissions. | |
| Dashboard & Reporting | Copilot Upload Metrics: Timeline, Volume, and |
| Categorizations (Policy, Extension, User, Time) | |
| Licensing | Based on storage source file system capacity. |
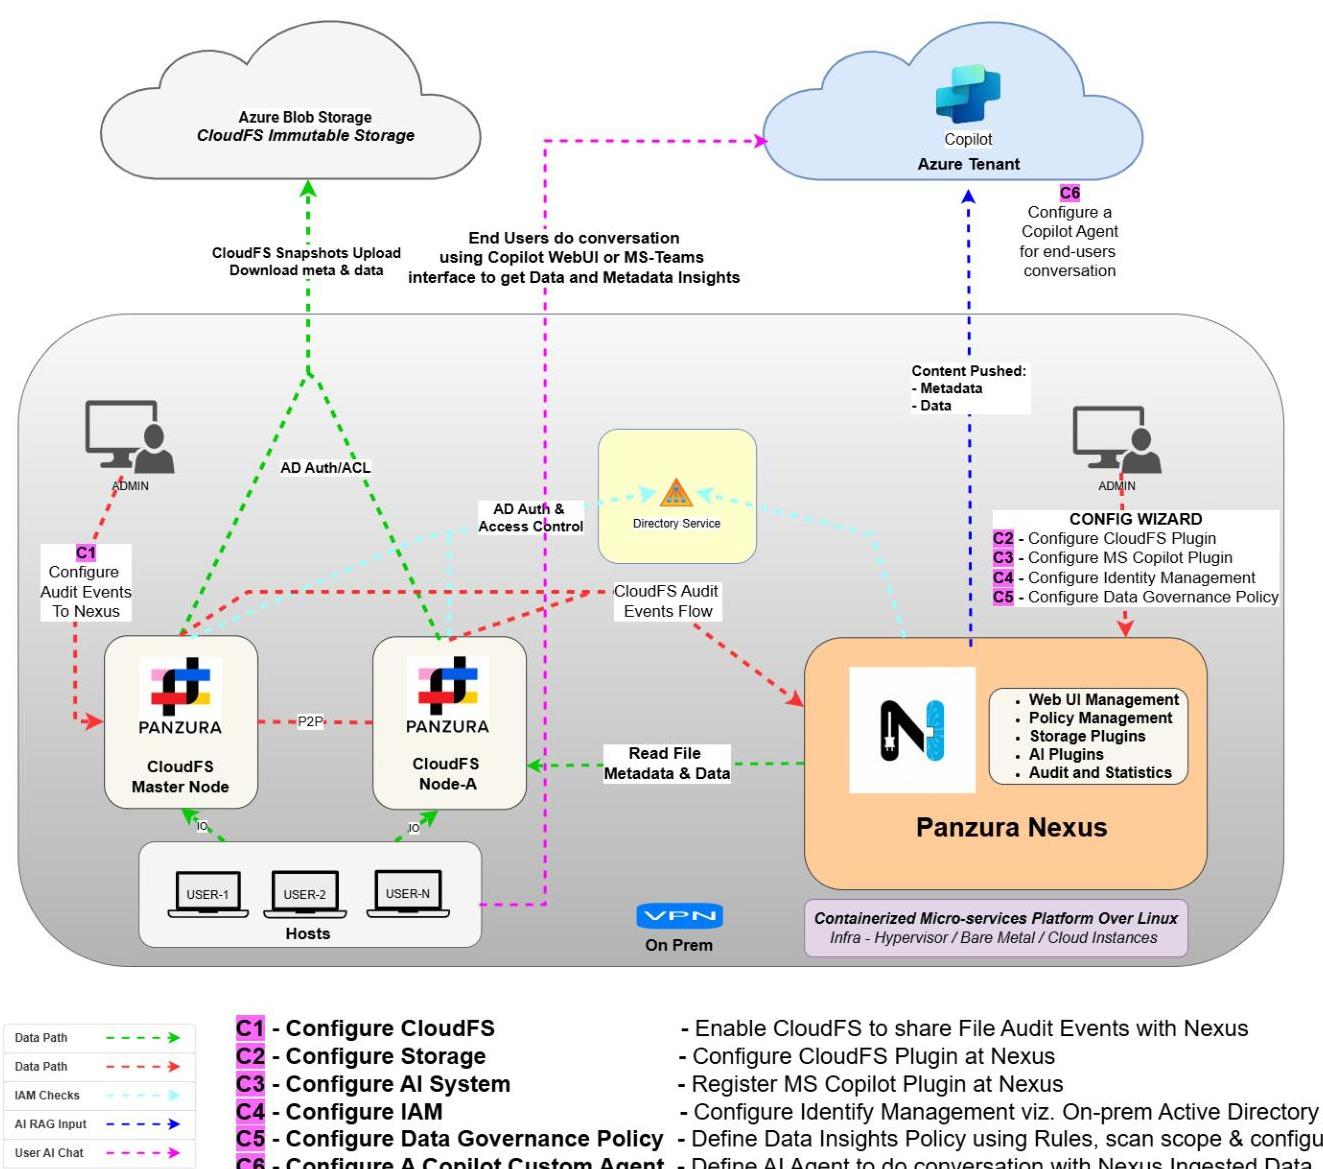
The Panzura Nexus architecture is centered around three primary components that work together to deliver secure, permissionaware, AI-powered insights from CloudFS data: CloudFS as the storage source, Microsoft Copilot as the AI system, and on-premises Active Directory for identity and access mapping. In addition, Data Insights policies and rules serve as supporting elements that define what data is ingested, how it is processed, and how insights are generated.
CloudFS (Storage Source) CloudFS serves as the primary data source for Panzura Nexus. It contains the enterprise's unstructured file datasets-including file content (data), metadata, directory structures, and ACLs. Panzura Nexus integrates with CloudFS through a dedicated plugin that connects directly to one of the CloudFS nodes. This node must be within the same LAN segment as the Panzura Nexus host to ensure:
- SMB access for reading file content and metadata
- Accurate and timely updates to maintain the freshness of data indexed in Microsoft Copilot
- Secure connectivity without exposure over external networks.
This architecture ensures that Panzura Nexus can continuously ingest both full-scan and real-time change events from CloudFS, maintaining an up-to-date representation of the file system.
Microsoft Copilot (AI System)
Microsoft Copilot acts as the AI engine that processes and interprets the content ingested from CloudFS. Panzura Nexus connects to Copilot through a Microsoft Graph Connector, enabling:
- Ingestion of selected file content and metadata based on configured policies.
- AI-powered search and conversational interactions.
- Secure access enforcement using existing enterprise permissions
- Configuring Copilot within Panzura Nexus is required to establish a connector that transfers CloudFS data into the Microsoft 365 ecosystem.
On-Premises Active Directory + Entra ID Connector (Identity Mapping & Access Control) Panzura Nexus supports onpremises Active Directory (AD) for user identity mapping, ensuring that security controls remain consistent across CloudFS and Microsoft Copilot. The Entra ID Connector links on-prem AD identities with Microsoft Entra ID, enabling:
- Accurate permission mapping for every CloudFS user
- Enforcement of ACLs during AI-based search and conversations
- Prevention of unauthorized data exposure in Copilot responses
Data Governance Policies
Panzura Nexus uses Data Governance policies to determine what data gets ingested into Microsoft Copilot. A policy includes:
- Rules: Filters based on file paths, extensions, metadata, timestamps, or custom conditions.
- Scan Scope: Defines whether the policy runs on full scans, event-based updates, or both.
- Configuration Settings: Specifies ingestion behavior, priority, and operational limits.
These policies ensure controlled, selective data ingestion aligned with security and business requirements.
Copilot Agent (Conversational Interface)
Using the Microsoft Agent Builder Portal, a Copilot Agent can be configured that:
- Provides conversational access to the data ingested from CloudFS
- Enables users to ask questions, explore insights, and perform tasks using natural language
- Applies access-control mappings to ensure secure and compliant responses
2.2 Compatibility and Support in Panzura Nexus
The following table summarizes the support metrics for Panzura Nexus, including supported operating systems, network port requirements, and recommended hardware specifications.
| Category | Supported / Required Details | Notes |
|---|---|---|
| Supported Platforms | - Microsoft Azure |
- Microsoft Hyper-V | - | | Hardware Requirements | - CPU: Minimum 16 cores
- Memory: Minimum 64 GB RAM
- Storage: 4 TB SSD for data
- Network:
- LAN: 10 Gbps (required)
- WAN: 1 Gbps (optional) | Panzura Nexus native image must be deployed within the same LAN segment as that of CloudFS node. | | Ports | - 443 (TCP - Inbound): Admin access to Panzura Nexus web UI
- 5671 & 5672 (TCP - Inbound): RabbitMQ message bus for CloudFS file change events
- 22 (TCP - Inbound): SSH connectivity from CloudFS node to Nexus
- 389 (TCP - Outbound): From Nexus to LDAP and LDAP with TLS
- 636 (TCP - Outbound): LDAPS | Ensure firewall rules permit the above traffic between Panzura Nexus and relevant systems. | | Directory Services | - Microsoft Active Directory (Onprem)
- Entra ID Connector (Hybrid AD Sync) | Required for identity mapping & permission-aware queries. | | CloudFS Versions | - 8.7.0
- 8.6.x
- 8.5.x | A functional CloudFS ring is required for Panzura Nexus to ingest audit & snapshot data. | | Browsers | - Google Chrome - 142.0.7444.176 (Official Build) (64-bit)
- Microsoft Edge
- Firefox ESR
- Apple Safari 18.3 | Recommended for Panzura Nexus web UI. | | Deployment Models | - On-prem VM (Hyper-V)
- Cloud VM (Azure) | |
2.2.1 Scanning and Scaling Panzura Nexus
This brief introduction highlights the key considerations for performing Nexus scans on Panzura CloudFS environments. For IT teams and administrators, the main guide provides actionable recommendations on node selection, operational best practices, and performance benchmarks to ensure efficient scanning with minimal impact on production workloads. For in-depth instructions and detailed metrics, refer to the Panzura Nexus Scanning & Scaling Guide.
2.3 Features in Panzura Nexus
This section provides a comprehensive overview of the key features and capabilities available within Panzura Nexus, including the latest updates, enhancements, and newly introduced features.
2.3.1 What's New?
This section outlines the latest updates, enhancements, and recent developments introduced in Panzura Nexus. Nexus version 1.1.1 is a maintenance release that delivers quality and security improvements across the platform. The release primarily focuses on resolving reported defects, strengthening product stability, and addressing identified security vulnerabilities.
2.3.2 Key Features
Backup and Restore
The Backup & Restore feature ensures data protection and system recovery by creating backups and restoring the system to a previously saved state. For more details, refer to Backup & Restore
Support for Comprehensive Indexing and Search for Large Files
Panzura Nexus indexes the entire text content of large files. When a file's extracted text exceeds the indexing limit, Nexus automatically splits it into smaller segments for indexing. This ensures that every part of the document, including the beginning, middle, and the end, becomes searchable through Microsoft Copilot. For more details, refer to Support for Comprehensive Indexing and Search for Large Files
New platform support for AWS, VMware, and Kernel-based Virtual Machine (KVM)
Support for additional platforms has been introduced, enabling deployment of Panzura Nexus on:
- AWS
- VMware
- Kernel-based Virtual Machine (KVM) environments
This enhancement broadens infrastructure compatibility and provides streamlined installation guidance to support a consistent and efficient deployment experience across supported environments. For more details, refer to Panzura Nexus Installation
Panzura Nexus Dashboard - System Overview
The Nexus Dashboard now features a streamlined interface with four dedicated tabs: Overview, CPU & Memory, Disk, and Network & System. This update consolidates all critical monitoring and analytics functions, making it easier to navigate and access key metrics.
- The Overview tab provides a high-level summary of system configuration and data ingestion.
- The CPU & Memory tab delivers real-time insights into processor and memory performance.
- The Disk tab tracks storage utilization and I/O activity, while the Network & System tab monitors network traffic, uptime, and overall system health. These enhancements empower administrators with unified, actionable visibility across the entire infrastructure.
For more details, refer to Panzura Nexus Dashboard
Support for Pause and Resume in Jobs
Panzura Nexus now gives administrators in-session control of active jobs with new Pause and Resume actions in the web UI. Instead of cancelling and restarting the jobs when priorities shift or resources are constrained, administrators can temporarily halt processing and continue from the exact same point. This helps reduce rework, improve operational flexibility, and manage resource-intensive workloads more efficiently. For more details, refer to Actions on Jobs
Additional Parameters in Settings
Panzura Nexus provides centralized Preferences controls for log level, session timeout, and local/cloud backup retention, improving system management and security. It also adds editable NTP settings so administrators can configure time servers and timezone for accurate, consistent timestamps across logs, schedules, and security events. For more details, refer to Settings > Preferences and Settings > NTP Configuration
Microsoft Copilot Integration
Panzura Nexus ingests selected CloudFS filesystem subset into Microsoft Copilot, enabling insights into the metadata and data.
AI conversation on the data and metadata
Panzura Nexus supports ingestion of over 1,000 file formats, making it easier to work with diverse data sources:
- Document formats:** PDF, DOCX, DOC, XLSX
- Image formats: JPEG, JPG, BMP
- AEC files: AutoCAD and more
With built-in Optical Character Recognition (OCR), Nexus can also extract text from images including those embedded within documents, ensuring no valuable information is missing.
CloudFS 8.7.0, 8.6.x or 8.5.x Support
Panzura Nexus integrates with CloudFS storage, supporting both real-time file system event processing and scheduled crawling. For more details, refer to Enabling CloudFS for Nexus
Active Directory Support
Panzura Nexus enforces on-premises Active Directory permissions via Entra ID connector, with synchronization to Microsoft Azure Entra.
Panzura Nexus Deployment
Microservices architecture supporting cloud instances (viz. Microsoft Azure) and hypervisors (viz. Hyper-V).
Access Control Compliance under SMB
Ensures all Copilot interactions comply with CloudFS SMB file-system permissions, with the ability to provide conversational support to additional users or groups.
Governance
Rules and Policies provide a governance framework that defines how data is ingested, processed, and interacted with. This framework can be applied based on content within specific directories, file path patterns, file extensions, file size, file timestamps, file ownership, and file modification attributes. For more details on Policies, refer to Configure Policies
For more details on Rules, refer to Configure Rules
Dashboard view
Displays live processing and historical statistics of System Overview and Data Insights policy. The System Overview provides statistics about plugins, rules, and policies. The Data Insights policy displays live and historical statistics, including charts for processed file counts, upload counts, failed processing events, and total uploaded file size across users and groups. It also delivers insights into ingested data such as total file count, overall file size, ingestion trends, file-type distribution, and userbased distribution. For more details, refer to Panzura Nexus Dashboard
Reports
Displays a list of ingested files for the selected policy with the ability to search and filter. For more details, refer to Reports
Catalog & Audit Capabilities
Panzura Nexus audits every operation, enabling administrators to query and filter activities with ease. It delivers a comprehensive data catalog and audit framework that:
- Tracks all ingested objects
- Produces file-type distribution reports
- Provides detailed user-level access and activity statistics
- Ensures transparent visibility into the data Copilot can access
For more details, refer to System Management Audits
Alerts
Notifies about system events that may require administrative action and intervention. For more details, refer to Alerts
Jobs Lists filesystem scan (full and incremental) jobs that are completed or currently running. For more details, refer to Jobs
Optimized Ingestion
Ingestion is optimized using incremental scans. Where applicable, only metadata is updated when data remains unchanged.
Scan support
The Scan Support feature in Panzura Nexus enables both manual and scheduled scans of your storage environment, ensuring comprehensive data visibility and up-to-date indexing. Administrators can initiate a full storage scan when activating a policy, allowing the system to analyze all existing data for compliance and reporting. The feature provides flexible scheduling options, including minute, hour, day, month, and weekday parameters, so scans can be tailored to organizational needs. When enabled, administrators can choose to run a full scan on policy activation or set up a recurring schedule using intuitive checkboxes. By default, new policies are created in an "Inactive" state, giving you full control over when scans are initiated and how often they occur.
Native VM Support
Panzura Nexus supports additional native VM formats, specifically VHDX for Hyper-V and ZMI for Microsoft Azure. For more details on Microsoft Azure, refer to Installing Panzura Nexus on Microsoft Azure
For more details on Hyper-V, refer to Installing Panzura Nexus on Microsoft Hyper-V
Enhanced Alerting
Added support for email notifications that are triggered by changes in Policy and Rule Status to provide real-time compliance visibility. For more details, refer to Email Notifications
Scoped Retrieval (Data Partitioning)
New policy-based controls allow users to limit Microsoft Copilot searches to specific datasets for more secure and relevant results.
Data Source Management
Rename or remap scanned roots and remove previously scanned folders (cleanup without a full rescan).
Ingestion Management
Improved performance and large-file handling.
License Management
License management in Nexus is the process of validating and enforcing the licenses required for the system to operate. It ensures that Nexus runs with a valid license tied to the storage system's capacity (such as CloudFS Managed Capacity). Licenses are managed through token strings registered in the Nexus System Management web UI, and if a license is missing or invalid, Nexus raises critical alerts. For more details, refer to License Management
Setup wizard / Edit Network Configuration
The Setup Wizard guides you through the essential steps required to configure your system for first-time use. Each stage ensures that critical parameters such as licensing, storage, networking, and time synchronization are properly defined for smooth and reliable operation. By following the wizard, administrators can quickly establish a secure, well-connected, and fully functional environment before moving on to daily tasks. For more details, refer to Edit Network Configuration
Download Logs
The Maintenance page provides administrators with essential system diagnostic tools to support troubleshooting and performance monitoring. It simplifies log collection by automatically aggregating system, container, and database logs into a single bundle, making it easier to analyze issues. For more details, refer to Download Logs
2.4 Panzura Nexus Checklist
The checklist outlines all required prerequisites along with the high-level steps involved in setting up Nexus.
| Prerequisites | Details | Notes |
|---|---|---|
| Supported Platform | - Microsoft Azure - Hyper-V - AWS - KVM - VMware |
- An active subscription with Contributor or Owner permissions. - Ensure that the images of Azure (.VHD) and Hyper-V (.VHDX) are downloaded and kept handy. - For AWS, ensure an active AWS account with the required EC2 permissions and the shared Nexus AMI available in the target region. - For KVM, ensure the Nexus QCOW2 image is available and the host has KVM/libvirt tools (virsh/virt-install) configured. - For VMware, ensure the Nexus VMware image package (OVA/ OVF and VMDK) is available and deployment permissions are granted in vCenter/ESXi. |
| Nexus Host Resource Requirement |
- CPU and Memory: Minimum 16 core / RAM 64 GB - Storage: - Additional SSD: Min 4TB - Networking: - LAN interface (Minimum 10Gbps throughput) with static IP address (wherever applicable) - WAN interface (Minimum 1 Gbps throughput) connectivity (optional if LAN interface has internet connectivity) |
A deployment environment for the Panzura Nexus platform, which can be an on-premises virtual machine or a cloud instance. Note: The Panzura Nexus native image for Azure and Hyper-V must reside within the same LAN segment as one of the CloudFS nodes. This is required for Panzura Nexus to have fast read access to the CloudFS filesystem data. Refer to detailed prerequisites. |
| Ports | - 443 (TCP - Inbound): Admin access to Nexus web UI - 5671 & 5672 (TCP Inbound): RabbitMQ message bus for CloudFS file change events - 22 (TCP - Inbound): SSH connectivity from CloudFS node to Nexus - 389 (TCP - Outbound): From Nexus to LDAP and LDAP with TLS |
Ensure firewall rules permit the above traffic between Nexus and relevant systems. |
| Prerequisites | Details
- 636 (TCP - Outbound): LDAPS | Notes | | --- | --- | --- | | Storage Configuration (CloudFS) | - A functional CloudFS ring (8.7.0, 8.6.x, and 8.5.x)
- CloudFS master node connection details and administrator credentials
- One of the CloudFS nodes within the deployment (recommended to set up a dedicated CloudFS node or use an existing less-loaded node)
- A SMB user with CloudFS global file-system read-only access at least | Note: As mentioned, the Panzura Nexus native image must reside within the same LAN segment as one of the CloudFS nodes for fast read access to CloudFS file-system data using SMB protocol. For enabling audit settings on CloudFS version 8.7.0, 8.6.x and 8.5.x, refer to Enabling CloudFS for Nexus. | | AI System Requirement | - Create a Microsoft Entra ID application using the customer Azure Tenant ID
- Client ID
- Client Secret | Refer to Register the application in Microsoft Entra ID to create an Entra ID application. | | Microsoft Entra ID Connector Setup | To keep your on-prem Active Directory Identity database in sync with Microsoft Entra ID, follow the Microsoft documentation steps. | A Microsoft Entra ID Connector is required to synchronize organization end-user accounts and enable access to CloudFS data insights through Copilot. Refer to the Introduction to Microsoft Entra Connect V2. | | On-prem Active Directory Information | - Hostname of the Active Directory
- Domain name
- AD Bind user (with user and group search capabilities)
- Connection information (LDAP / LDAPS / LDAP with TLS) | On-prem AD details and bind user accounts are needed to map CloudFS users to corresponding Entra ID accounts for consistent access control. Check with your AD administrator for details. Refer to detailed prerequisites in the section. |
2.4.1 Detailed Prerequisites Overview
The section describes the details of each prerequisite mentioned in the checklist:
Set up the Nexus Host
Prepare the host environment for Nexus deployment by ensuring the following:
- Panzura Nexus installer ZMI image / VHDXs.
- Allocate 16 CPUs and 64 GB RAM.
- Provide 4 TB RAW SSDs for Nexus usage.
- Configure network with 10 Gbps LAN and a static IP (wherever applicable) (1 Gbps WAN optional).
- Set up NTP, DNS, and Gateway.
Note: This Nexus host and the CloudFS node must be deployed in the same LAN.
Configure CloudFS
To enable Nexus to ingest audit, snapshot, and metadata from CloudFS:
- Ensure that a functional CloudFS ring is running 8.7.0, 8.6.x or 8.5.x.
- Keep CloudFS master node connection details and administrator credentials ready.
- Provide access to at least one CloudFS node.
- For best performance, use a dedicated node or a low-load node.
- Create or provide an SMB user account with global read-only access to CloudFS.
- Deploy the Nexus host in the same LAN segment as a CloudFS node for reliable SMB-based access.
Integrate Nexus with Microsoft Copilot
To enable Copilot-based data and metadata ingestion:
- Ensure a Microsoft 365 tenant with Copilot-enabled end-user licenses is available.
- Keep handy the following values by registering the application in Microsoft Entra ID:
- Tenant ID
- Client ID
- Client Secret
Refer to the Register the application in Microsoft Entra ID for more detailed steps.
Set up On-prem Active Directory
The following parameters are required:
- Hostname of the Active Directory: Allows Nexus to locate and communicate with the AD server.
- Domain name: Identifies the AD domain for authentication and user lookup.
- AD Bind user: Service account used to search and retrieve user and group information.
- Connection information (LDAP / LDAPS / LDAP with TLS): Defines how Nexus connects securely to AD.
- On-prem AD details: Required for mapping CloudFS users to Entra ID accounts for consistent access control.
2.4.2 Upload Nexus VHDs to Azure Private Marketplace
This procedure will guide you in uploading the Nexus VHD to Marketplace.
- Login to Azure portal with Owner or contributor role.
- Search for the text "Storage Accounts" and you are redirected to Home Storage Center Blob Storage .
- Under Resources tab, search for the Storage Account, for example: eastus.
- There are two ways to upload the .vhd files: a. Add a new container and push the vhd to the new container. b. Upload the vhd to an existing container by selecting the vhd from the container and click Upload.
- After uploading the VHD, create Azure image from the blob. Search for Compute infrastructure.
- Under Disks + images, click Custom images Images tab and click + Create.
- Provide the following details on the Azure image:
- Resource Group Name: Select from the dropdown. For example: QA
- Name: Provide the name to the image and note it for later use.
- Region: Select from the dropdown. For example: East US
- OS Type: Linux
- VM Generation: Gen1
- Storage Blob: Blob URL of the uploaded vhd to the container.
- Account Type: Premium SSD
- Click Review + Create and keep the remaining configuration parameters as is. After all the parameters are provided, a new image will be created which can be used to deploy as virtual machine in Azure.
- After the virtual machine is created, spawn it by navigating to Custom image (Compute infrastructure > Custom image).
- Select the image created in step 6. Click + Create VM. Enter the required configuration. Refer to the screenshot for inputs.
| Basics | Disks | Networking | Management | Monitoring | Advanced | Tags | Review + create |
|---|---|---|---|---|---|---|---|
| Create a virtual machine that runs Linux or Windows. Select an image from Azure marketplace or use your own customized image. Complete the Basics tab then Review + create to provision a virtual machine with default parameters or review each tab for full customization. Learn more ☐ | |||||||
| Project details | |||||||
| Select the subscription to manage deployed resources and costs. Use resource groups like folders to organize and manage all your resources. | |||||||
| Subscription * ☐ | Subscription-Panzura | ||||||
| Resource group * ☐ | QA | ||||||
| Create new | |||||||
| Instance details | |||||||
| Virtual machine name * ☐ | nexus-nk-1 | ||||||
| Region ☐ | G2G East US | ||||||
| Display to an Azure Extended Zone | |||||||
| Availability options ☐ | Availability zone | ||||||
| Zone options ☐ | ☑ Self-selected zone | ||||||
| Choose up to 3 availability zones, one VM per zone | |||||||
| Azure-selected zone (Preview) | |||||||
| Let Azure assign the best zone for your needs | |||||||
| Using an Azure-selected zone is not supported in region 'East US'. | |||||||
| Availability zone * ☐ | Zone 1 | ||||||
| Security type ☐ | Standard | ||||||
| Image * ☐ | |||||||
| VM architecture ☐ | |||||||
| Arm64 | |||||||
| ☑ x64 | |||||||
| Arm64 is not supported with the selected image. | |||||||
| Run with Azure Spot discount ☐ | |||||||
| Size * ☐ | Standard_816s_v2 - 16 vcpus, 64 GB memory ($486.18) | ||||||
| See all sizes |
Run with Azure Spot discount ☐ ☐
Size * ☐ Standard $16s, >2 - 16 vcpus, 64 GB memory ($486.18) See all sizes
Enable Hibernation ☐ ☐ Choose an image that is compatible with Hibernate to enable this feature. Learn more ☐
Administrator account
Authentication type ☐ SSH public key ☑ Password
Username * ☐ panzura
Password * *************
Confirm password * ***********
Inbound port rules
Select which virtual machine network ports are accessible from the public internet. You can specify more limited or granular network access on the Networking tab.
Public inbound ports * ☐ None ☑ Allow selected ports
Select inbound ports * HTTP (80), HTTPS (443), SSH (22) ☐ HTTP (80) ☑ HTTPS (443) ☐ SSH (22)
Licensing
License type * Other
If you are using a RedHat or SLES image, you may be eligible for the Azure Hybrid Benefit and can save money on the license costs. Learn more about Azure Hybrid Benefit and how to enable it using Azure CLI for custom images from snapshots and Azure compute gallery.
| Previous | Next : Disks > | Restore > Create |
|---|---|---|
- 19/85 - Copyright © Panzura, LLC. 2020 | panzura.com
Basics
Disks Networking Management Monitoring Advanced Tags Review + create
Azure VMs have one operating system disk and a temporary disk for short-term storage. You can attach additional data disks. The size of the VM determines the type of storage you can use and the number of data disks allowed. Learn more
There is a charge for the underlying storage resources consumed by your virtual machine. Learn more
VM disk encryption
Azure disk storage encryption automatically encrypts your data stored on Azure managed disks (OS and data disks) at rest by default when persisting it to the cloud.
Encryption at host
Encryption at host is not registered for the selected subscription. Learn more
OS disk
| OS disk size | Image default (60 GB) | ☑ |
|---|---|---|
| OS disk type * | Premium SSD (locally-redundant storage) | ☑ |
| Delete with VM | ||
| Key management | Platform-managed key | ☑ |
| Enable Ultra Disk compatibility |
Data disks for nexus-nk-1
You can add and configure additional data disks for your virtual machine or attach existing disks. This VM also comes with a temporary disk.
| LUN | Name | Size (GB) | Disk type | Host caching | Delete with VM |
|---|---|---|---|---|---|
Create and attach a new disk. Attach an existing disk.
Advanced
Basics Disks Networking Management Monitoring Advanced Tags Review + create
Define network connectivity for your virtual machine by configuring network interface card (NIC) settings. You can control ports, inbound and outbound connectivity with security group rules, or place behind an existing load balancing solution. Learn more
Network interface
When creating a virtual machine, a network interface will be created for you.
| Virtual network (1) | QA-Virtual-Network (QA) | |
|---|---|---|
| Edit virtual network | ||
| Subnet * (1) | qa-private-app | |
| Edit subnet | 10.208.5.0 - 10.208.5.255 (256 addresses) | |
| Public IP (1) | None | |
| Create new | ||
| NIC network security group (1) | (1) None | |
| (1) Basic | ||
| (1) Advanced | ||
| (1) The selected subnet 'qa-private-app (10.208.5.0/24)' is already associated to a network security group 'aadds-nsg'. We recommend managing connectivity to this virtual machine via the existing network security group instead of creating a new one here. | ||
| Delete NIC when VM is deleted (1) | ||
| Enable accelerated networking (1) |
The selected image does not support accelerated networking.
Load balancing
You can place this virtual machine in the backend pool of an existing Azure load balancing solution. Learn more Place this virtual machine behind an existing load balancing solution? 11. Use the default settings for Management, Monitoring, Advanced, and Tags unless your deployment requires changes. 12. Click on Review + Create. It will validate the configuration and then, click on Create to spawn the new virtual machine in Azure.
2.4.3 Share an AWS AMI image
Prerequisites
- Ensure you have an active AWS account with sufficient permissions (EC2 full access or at least ec2:ModifyImageAttribute).
- Confirm that the required AMI (Panzura_Nexus_1.1.0-xxxxx) is available in the us-west-2 (Oregon) region.
- Obtain the 12-digit AWS Account ID (e.g., 123456789012).
Note: You can only share an AMI within the AWS region where it was created. To find and use the shared AMI, make sure you are viewing the same region (for example, us-west-2) in your AWS Console. If you want to use the AMI in a different region, you need to copy it to that region first and then share it again.
To share an AWS AMI with other accounts, follow these steps in the same AWS region where the AMI was created.
Step 1: Log in to the AWS Management Console
- Open the browser and navigate to https://console.aws.amazon.com.
- Sign in using your AWS credentials (IAM user or SSO) that have EC2 permissions on the source account (909559806924 [Panzura-engineering]).
- Ensure the region selector (top-right corner of the console) is set to US West (Oregon) / us-west-2.
Step 2: Navigate to the AMI
- In the AWS Console search bar at the top, type EC2 and click on EC2 under Services.
- In the left-hand navigation panel, under the Images section, click AMIs.
- In the AMI list, ensure the filter is set to Owned by me (use the dropdown above the list).
- Locate the AMI named Panzura_Nexus_1.1.0-xxxxx (AMI ID will appear in the same row).
- Click the checkbox next to the AMI to select it.
Step 3: Open AMI Permissions (Sharing Settings)
- With the AMI selected, click the Actions dropdown button at the top-right of the list.
- From the dropdown, select Edit AMI permissions. Alternatively, you can click on the AMI name to open its detail page, then go to the Permissions tab and click Edit. You will see the AMI Permissions dialog or page. By default, the AMI is set to Private (only your account can use it).
Step 4: Add the other AWS Account ID
- Under the Shared accounts section, click Add account ID.
- In the input field that appears, enter the 12-digit AWS Account ID (e.g., 123456789012 ).
- If sharing with multiple accounts, click Add account ID again for each additional account and enter their respective IDs.
- Tip: You do not need to repeat this process per account, all account IDs are managed in one permission list on the same AMI.
- (Optional) If you also want to copy the AMI to another account (not just launch from it), check the option Allow shared accounts to copy the AMI. Leave this unchecked if you want to restrict usage to launches only from your shared AMI.
- Click Save changes.
Step 5: Verify the Sharing
- Navigate back to the AMI list (EC2 Images AMIs).
- Click on the Panzura_Nexus_1.1.0-xxxxx AMI name to open the detail view.
- Go to the Permissions tab.
- Confirm the other account ID appears under Shared with.
Step 6: Access the Shared AMI
- Login to the AWS Console with the account shared the AMI images by navigating to EC2 Images AMIs.
- In the filter dropdown, change the view from Owned by me to Private images or select Shared with me.
- Search for Panzura_Nexus_1.1.0-xxxxx or the AMI ID shared earlier.
- Select the AMI and click Launch instance to deploy it as an EC2 virtual machine.
Important: The recipient must be in the us-west-2 (Oregon) region in their console to see and launch the shared AMI.
Adding or Removing accounts
- To add a new account: Repeat Steps 3-4 and add the new account ID.
- To remove an account: Go to EC2 AMIs Edit AMI permissions, find the account ID under Shared accounts, and click Remove next to it. Changes take effect immediately - no procurement workflow needed.
2.4.4 Enabling CloudFS for Nexus
Before proceeding with the Nexus configuration, complete the following settings on the CloudFS master and subordinate nodes. CloudFS serves as the storage source for Nexus, and these configurations are required to enable this integration.
Note: To enable Data Insights, third-party audit settings must be enabled on every CloudFS node. For CloudFS 8.6.x and 8.7.0, configure these settings in the UI; for CloudFS 8.5.x, run the Third-Party Audit Enablement CLI commands on all nodes.
For version 8.6.x and 8.7.0
- Login to the CloudFS master node and navigate to Configuration > Monitoring > Audit Settings.
- Select the following settings:
| Settings (master node) | Actions |
|---|---|
| Third Party Vendor Support | Generate Third Party Log - Enable the toggle |
| Push to Subordinate(s) - Enable the toggle | |
| User Actions - Create File, Delete, Delete Permissions, | |
| Move, Remove, File Lock, Change Permissions, Write | |
| Vendor Name - Nexus | |
| Master Audit Settings | Generate Third Party Log - Enable the toggle |
| User Actions - Create File, Delete, Delete Permissions, | |
| Move, Remove, File Lock, Change Permissions, Write | |
| Vendor Name - Nexus |
- Login to the CloudFS subordinate node and navigate to Configuration > Monitoring > Audit Settings.
| Local Audit Settings (subordinate node) | Actions |
|---|---|
| Third Party Vendor Support | Generate Third Party Log - Enable the toggle |
| User Actions - Create File, Delete, Delete Permissions, | |
| Move, Remove, File Lock, Change Permissions, Write | |
| Vendor Name - Nexus |
- Logout from the CloudFS web UI after the settings are done.
For version 8.5.x
SSH to the CLI of the CloudFS master node using administrator credentials.
Run the following commands:
pf_startup_ofy cmd audit-master-thirdparty "nexus" on "create,delete,deleattr,move,remove,riclain,seteattr,write" "*" "."
pf_startup_ofy cmd audit-local-thirdparty "nexus" on "create,delete,deleattr,move,remove,riclain,seteattr,write" "*" "."
pf_startup_ofy cmd audit-thirdparty enable
pf_startup_ofy write
Repeat the commands on each subordinate node:
pf_startup_ofy cmd audit-local-thirdparty "nexus" on "create,delete,deleattr,move,remove,riclain,seteattr,write" "*" "."
pf_startup_ofy cmd audit-thirdparty enable
pf_startup_ofy write
2.5 Panzura Nexus Installation
This topic provides comprehensive guidelines for installing the Panzura Nexus in the supported environment. It outlines the step-by-step installation procedures to ensure a smooth and reliable deployment. Before starting with the installation, ensure that all the prerequisites are met.
2.5.1 Installing Panzura Nexus on Microsoft Azure
Before starting with the installation, ensure that the Panzura Nexus VHD is uploaded on the marketplace. Refer to the prerequisites section.
- Login to Azure Portal. Ensure you have an active subscription with Contributor or Owner permissions.
- From the left navigation pane, navigate to Home Infrastructure Virtual machines.
- Click Create and select Virtual machine.
- Configure the VM details including VM name, region, availability options, and availability zone as applicable.
- Select the Panzura Nexus image from the dropdown.
- Choose as the virtual machine architecture.
- Configure the administrator account by selecting SSH key or password authentication and provide the required credentials.
- Allow inbound ports: - SSH (22) - HTTP (80) - HTTPS (443)
- Add data disks of 4 TB .
- Configure networking including VNet, subnet, public IP, network security group (NSG), and enable accelerated networking as applicable.
- Configure management settings such as diagnostics, monitoring, auto-shutdown, and backup options.
- Review the configuration and click Create** to provision the virtual machine.
- Note the IP_address of the Panzura Nexus virtual machine deployed.
- Access the Panzura Nexus web UI using the link - https://vm_ip.
- Follow the steps from the Accessing Panzura Nexus setup wizard topic to complete the setup wizard.
2.5.2 Installing Panzura Nexus on Microsoft Hyper-V
Prerequisites on the Hyper-V Host
- Ensure Hyper-V is configured.
- The user has sufficient permissions to create new virtual machine.
- An external virtual switch should be available.
Create a New Virtual Machine on Hyper-V
- Right click on the .tar.gz bundle to extract it. You may need to perform the extract action twice to get the .vhdx image.
- Copy the .vhdx image to the destination virtual machine folder or directory.
- Navigate to Hyper-V Manager and select New > Virtual Machine.
- Enter a name for the virtual machine.
- Choose Generation 1.
- Assign at least 64 GB of memory.
- Select network in Configure Networking and click Next.
- On Connect Virtual Hard Disk, select the "Use an existing virtual hard disk" and **Browse the vhdx image copied in step 2.
- Click Finish on the wizard and verify if the virtual machine is created.
- Right click on the virtual machine deployed and open the Settings.
- Update the BIOS settings, and select IDE as the first boot device.
- Update the Processor count at least by 16 .
- In SCSI Controller, add new disk of 4TB.
Note: You can configure the VLAN settings as per the network configuration or requirements. 14. Right-click on the virtual machine and click Start. The virtual machine state changes to "Running" and the IP address is generated. Note it. 15. Access the Panzura Nexus web UI using the link - https://vm_ip. 16. Follow the steps from the Accessing Panzura Nexus setup wizard topic to complete the setup wizard.
2.5.3 Installing Panzura Nexus on AWS
- Login to AWS portal.
- From the Console Home, search for keywords "AMIs".
- On the Amazon Machine Images (AMIs), search for the nexus image to be deployed.
- Select the image and click "Launch Instance from AMI".
- On Launch an instance page, provide the following details:
- Name and tags: Provide appropriate name to the image.
- Instance type: Select instance type as per the requirements (Select min 16 CPUs and 64 GB Memory).
- Key pair: Create new key file and add it.
- Network settings: Configure the network settings as required.
- Firewall: Select as per the requirement.
- Common security groups: Select as per the requirement.
- Configure storage: Click "Advanced > Storage (volumes) > Add new volume > size min 100 GB. Select any one of the option ("Yes" or "No") for Delete on termination parameter.
- Click on "Launch instance". This process takes some time.
- From the instance summary page, copy the ip address.
- Access the Panzura Nexus web UI using the link - https://vm_ip.
- Follow the steps from the Accessing Panzura Nexus setup wizard topic to complete the setup wizard.
2.5.4 Installing Panzura Nexus on VMware
- Login to VMware vSphere Client.
- Navigate to Home > Content Libraries. Select the Content Library from the list and click on the Templates tab.
- Locate the .ova file from the list. Click Actions > New VM from this template and provide the following details:
- Virtual machine name
- Select a location for the virtual machine and click Next.
- On Select a compute resource, select the resource and click Next.
- On Review the details and click Next.
- On Select storage, choose the appropriate disk from the list and click Next.
- On Select networks, choose the required Destination Network from the dropdown and click Next.
- On Ready to complete, review the configuration details and click Finish.
- Again navigate to Actions > Edit Settings > Add New Device.
- On the New Hard disk parameter, add min 100 GB , select any one option from the dropdown and click OK.
- On the Datastore Recommendations, click Apply.
- Power On the virtual machine and note the IP address.
- Access the Panzura Nexus web UI using the link - https://vm_ip.
- Follow the steps from the Accessing Panzura Nexus setup wizard topic to complete the setup wizard.
2.5.5 Installing Panzura Nexus on KVM
- Verify the source QCOW2 image exists:
ls -lh /.qcow2
- Clean up any existing VM with the same name (skip if fresh):
virsh --connect qemu:///system destroy 2>/dev/null; virsh --connect qemu:///system underline --erram 2>/dev/null; rm -rf
- Create VM directory and copy boot disk:
mkdir -p & cp /.qcow2 /.qcow2
- Create the VM with virt-install:
virt-install \ --connect qemu:///system \ --noautoconsule \ --virt-type km \ --sa-variant \ --name \ --memory \ --vcpus \ --channel
unis.target.type=virtio.target.name=org.qemu.part_agent.0 \ --network network;.model.type=virtio,virtualport.type=,source.portgroup=.mtu.size= \ --
disk /.qcow2,format=qcow2,bus=virtio,serial= \ --import \ --disk path=/.qcow2,size=,bus=virtio,format=qcow2,serial= \ --disk path=/.qcow2,size=,bus=virti
s,format=qcow2,serial=
- Verify VM is running:
virsh --connect qemu:///system list --all
- Check VM details:
virsh --connect qemu:///system dominfo
- Wait minutes for boot, to get the VM IP:
virsh --connect qemu:///system domifaddr --source agent
- Access the Panzura Nexus web UI at:
https://cvm_ip>
- Follow the steps from the Accessing Panzura Nexus setup wizard topic to complete the setup wizard.
2.5.6 Accessing Panzura Nexus setup wizard
The following steps are common after you login into the web UI. The setup wizard consists of following steps:
1. License Agreement:
Read the EULA. Navigate back to Nexus web UI, select the checkbox for "I accept the terms and conditions of the End User License Agreement".
2. Storage Configuration:
This screen shows the Storage Configuration step, where you choose which disks will be used for data storage. The table lists available devices along with their capacities.
3. Network Configuration:
The Network Configuration step consists of the following parameters:
1. System Configuration:
Used to define essential system details required for proper operation. It allows administrators to configure core parameters such as the System name (e.g. <systemname>) and Fully Qualified Domain Name (FQDN) (e.g. <systemname.domainname.com>), ensuring correct system identification and network communication.
2. LAN Configuration:
This screen shows the LAN Configuration settings used to configure network connectivity for the system. Provide the following parameters:
- Select a LAN Interface
- IP Assignment method
- DHCP (Automatic)
- Static (Manual)
- IP Address
- Netmask
- Gateway
- MTU
- Primary DNS
- Secondary DNS
You can select the LAN interface (in this case, eth0) and choose the IP assignment method, either DHCP (Automatic) or Static (Manual). When using a static configuration, fields are provided to enter the IP address, netmask, gateway, and other network parameters such as MTU and DNS servers. This setup ensures the system is correctly connected to the local network.
3. WAN Configuration:
WAN configuration involves setting up the connection between your local network (LAN) and the broader internet or another remote network.
4. View Available Interface:
This parameter displays the available network interface details.
4. Time Configuration:
NTP (Network Time Protocol) configuration involves setting up devices like servers, routers, and switches to synchronize their internal clocks with a reliable time source. Provide the NTP Server and System Timezone and click " " to proceed.
5. Summary:
Review the summary of the configuration. You can navigate back to modify any parameter. Click the Complete Setup. Note: If a failure occurs during the Nexus setup wizard configuration, logs can be downloaded from https://<IP>/api/host/ settings/logs/download to investigate the issue.
2.5.7 Panzura Nexus Web UI Walkthrough
This section provides a guided walkthrough of the web UI to help administrators and users quickly familiarize themselves with the interface. It highlights key navigation components, essential menus, and commonly used actions, enabling you to understand where critical features are located and how to access them efficiently.
Use this walkthrough as a starting point before exploring advanced configuration or management workflows.
| Icon | Parameters | Description |
|---|---|---|
| DASHBOARD | Dashboard | The dashboard provides a comprehensive view of Systems Overview and Data Insights policies, offering visibility into all configured policies and the data populated from them. As part of the data ingestion process, system data is continuously collected from multiple sources, processed, and mapped to the relevant policies and rules. This ensures that the dashboard reflects the most current and accurate information available. In addition, the dashboard highlights how system data retrieved through rules contributes to |
| Icon | Parameters | Description |
|---|---|---|
| Data Insights policies, providing a unified and actionable view of both configuration and operational data. | ||
| Storage Systems | Storage Systems | Configure CloudFS by supplying the master node credentials and establishing SMB connections. This process sets up and enables the integration between CloudFS and Panzura Nexus. |
| (1) AI Systems | AI Systems | Configure the Microsoft Copilot to establish connection with Panzura Nexus. |
| (2) Identity Management | Identity Management | Configure the AD credentials to establish connection with Panzura Nexus. |
| Rules | Rules | Define rules that determine how the policies are executed. |
| (3) Policies | Policies | Configure custom policies (like Data Insights) using Storage Systems, AI Systems, IAM, and rules. |
| (1) Jobs | Jobs | View to track full scans, export operations, and monitor the current status. |
| (11) Reports | Reports | View Data Insights full scans, policies, and related events, including both ongoing and completed tasks. |
| CONFIGURATION | Settings | Quick access to Settings like - License Management, Email Notifications, Network, Preferences, and NTP Configuration. |
| (12) Settings | ||
| MAINTENANCE | Maintenance | Manage and monitor core system maintenance tasks and operational activities. |
| (1) System Operations | ||
| (4) | Alerts | Tracks live processing metrics and system thresholds, generating notifications for important events or conditions. |
| (5) | Audits | Displays audit events generated by CloudFS, allowing administrators to review activity and trace operational actions within the environment. |
| User Profile | Displays details of the user logged into the Panzura Nexus along with Build version, Help icon which |
| Icon | Parameters | Description |
|---|---|---|
| displays the Online Help, Replay | ||
| Tour which displays the guided tour of the Panzura Nexus UI and Logout option. | ||
| and | Next and Previous | To navigate to the previous or next pages. |
| Submit | To save the configuration changes. |
2.6 Panzura Nexus Dashboard
A centralized management and analytics platform designed to provide unified visibility and control across global file system deployments. It enables administration teams to monitor system health, track performance, and gain actionable insights across distributed environments from a single interface. By simplifying operations and enhancing observability, dashboard helps organizations ensure data availability, optimize performance, and confidently manage their hybrid and multi-site infrastructure.
Dashboard is divided into two sections:
- System Overview
- Data Insights
2.6.1 System Overview
Provides a unified summary of all key configurations and system health across the Panzura Nexus environment, enabling quick assessment and centralized management.
Overview
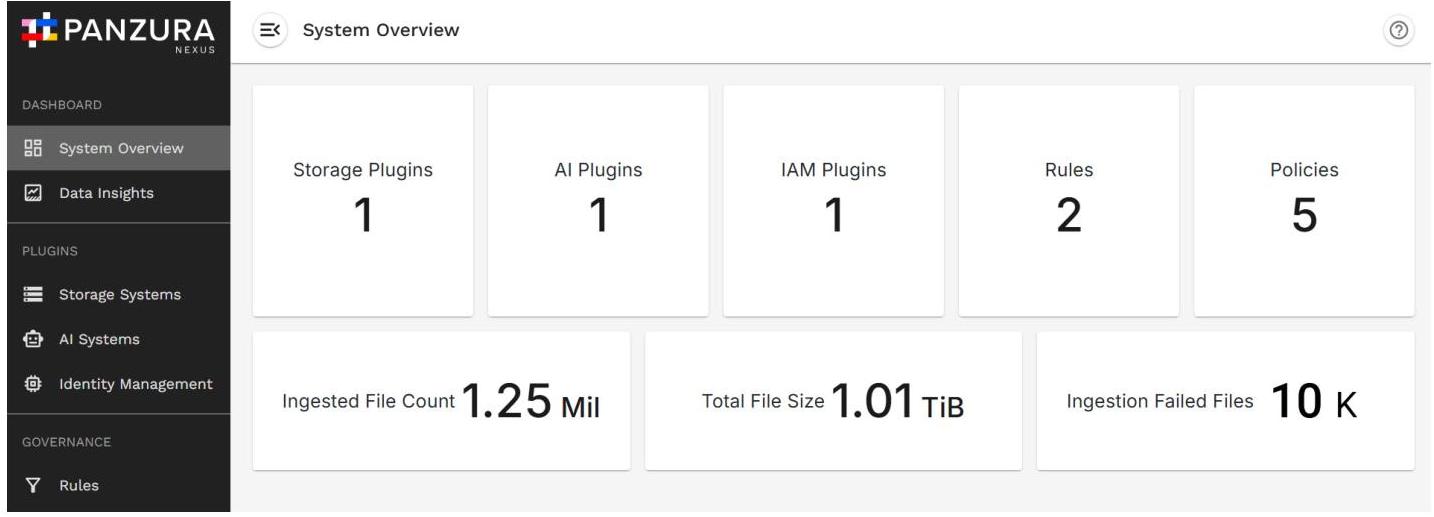
Provides a consolidated view of the configured Storage Plugins, AI Plugins, IAM Plugins, Rules, and Policies across Nexus. It displays the overall status and summarizes the total number of configuration instances, giving administrators quick insight into how the system is set up and managed.
You can view details of each instances by navigating over the tile.
| Parameter | Description |
|---|---|
| Storage Plugins | Number of configured storage integrations. |
| AI Plugins | Active AI-powered processing modules. |
| IAM Plugins | Identity and access management integrations. |
| Rules | Total rules currently applied across the system. |
| Policies | Defined governance and control policies. |
| Ingested File Count | Total number of files successfully ingested. |
| Total File Size | Combined size of all ingested data. |
| Ingestion Failed Files | Number of files that failed during ingestion. |
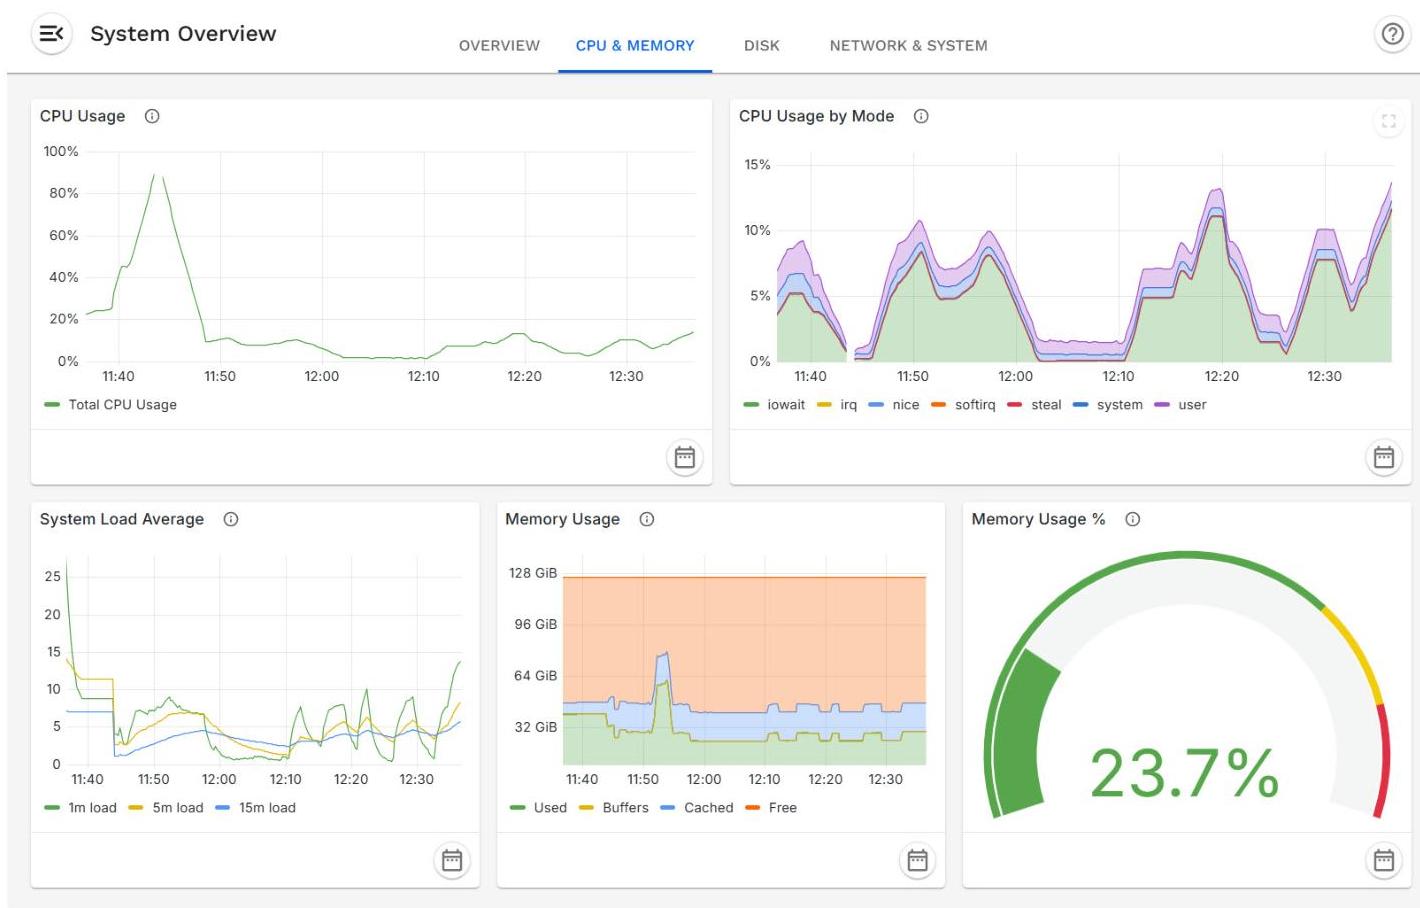
CPU & Memory
Monitors real-time system performance, including CPU activity, load trends, and memory utilization.
| Metric | Description |
|---|---|
| CPU Usage | Displays total CPU consumption over time, helping identify spikes, sustained load, or idle periods. |
| CPU Usage by Mode | Breaks down CPU utilization by mode: |
| User | Time spent running user processes |
| System | Kernel-level operations |
| I/O Wait (iowait) | Time waiting for disk I/O |
| Nice | Adjusted priority processes |
| IRQ / SoftIRQ | Hardware and software interrupt handling |
| Steal | Time taken by virtualized environments |
| System Load Average | Shows system load across 1-minute, 5-minute, and 15-minute intervals, indicating overall demand on CPU resources. |
| Memory Usage | Visualizes memory allocation: |
| Used | Memory actively in use |
| Buffers | Temporary data for system operations |
| Cached | Memory used for caching frequently accessed data |
| Free | Available unused memory |
| Memory Usage % | Provides a quick view of overall memory utilization, with thresholds indicating normal, warning, and critical levels. |
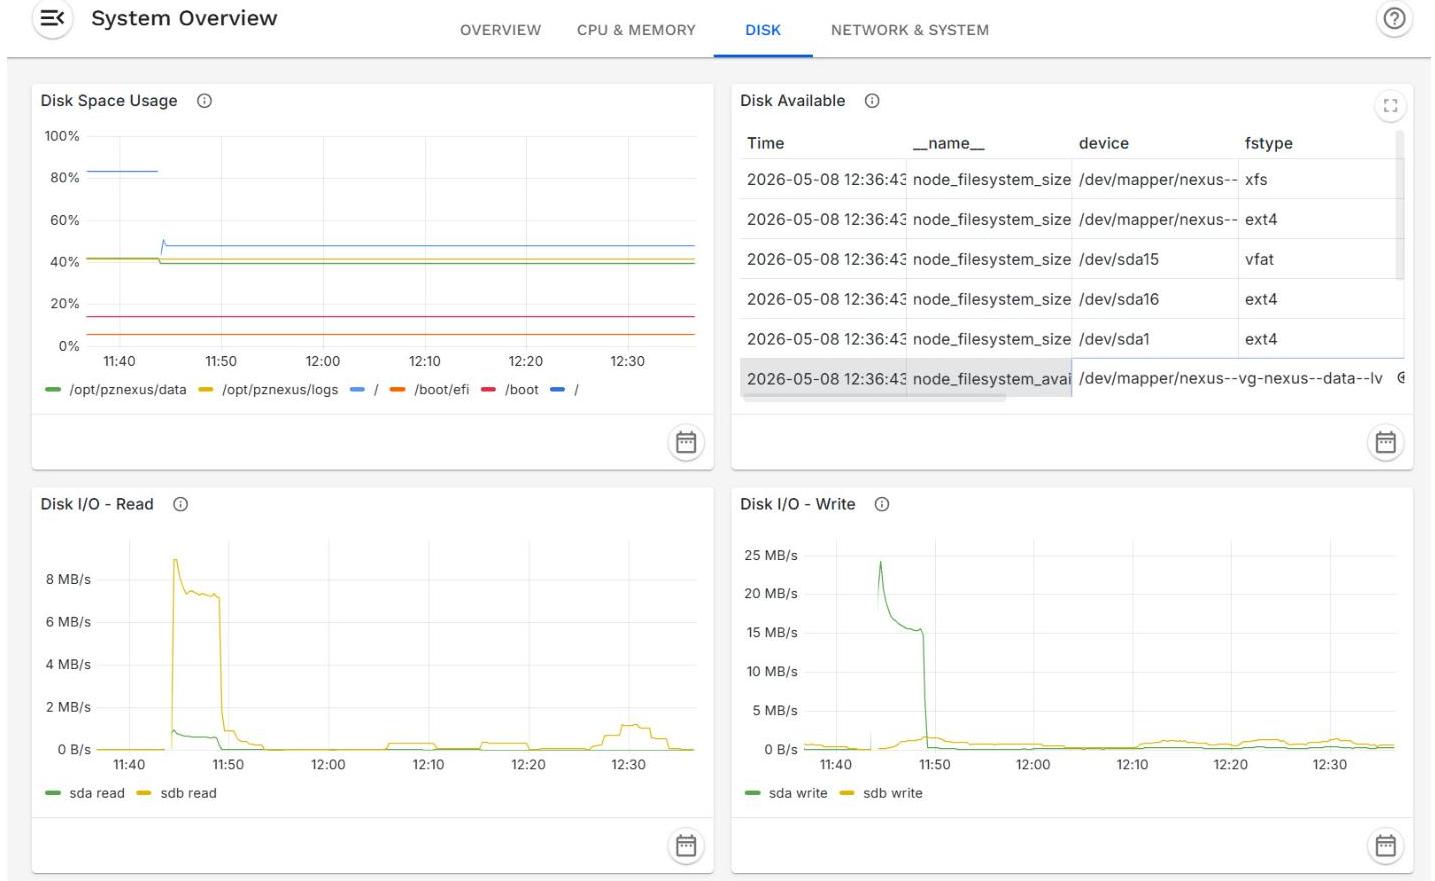
Disk Track disk utilization, capacity, and I/O performance across devices and mount points.
| Metric | Description |
|---|---|
| Disk Space Usage | Shows disk usage across key mount points over time, helping identify capacity trends and potential storage constraints. |
| Disk Available | Lists current disk availability by device, including: |
| Device | Disk or partition name |
| Filesystem Type | Format (e.g., xfs, ext4, vfat) |
| Instance / Job | Source of the metric data |
| Timestamp | Latest recorded value |
| Disk I/O - Read | Displays read throughput (MB/s) per device, useful for identifying read-heavy workloads and performance bottlenecks. |
| Disk I/O - Write | Displays write throughput (MB/s) per device, highlighting write activity and potential saturation points. |
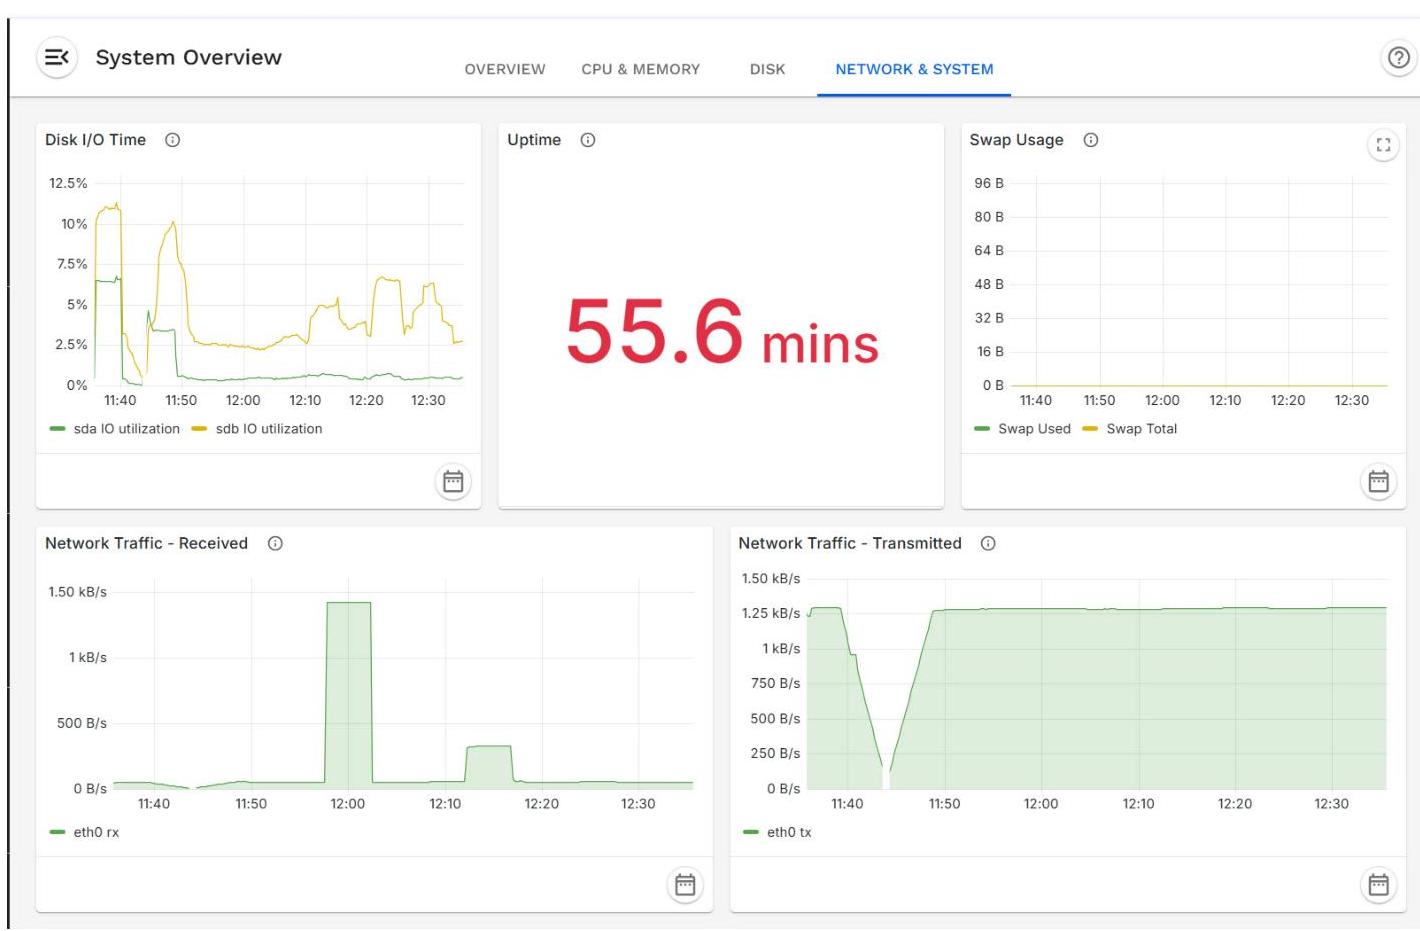
Network & System
Monitor system stability, disk latency, and network activity to ensure overall operational health.
| Metric | Description |
|---|---|
| Disk I/O Time | Shows the percentage of time disks are busy handling I/O requests. Higher values may indicate disk contention or performance bottlenecks. |
| Uptime | Displays how long the system has been running without interruption, helping track stability and recent restarts. |
| Swap Usage | Tracks swap memory utilization over time. Consistent or high swap usage may indicate memory pressure. |
| Network Traffic - Received | Displays incoming network traffic (bytes/sec) on active interfaces, useful for understanding inbound data flow. |
| Network Traffic - Transmitted | Displays outgoing network traffic (bytes/sec), helping monitor outbound communication and load. |
| Network Errors | Tracks errors encountered on network interfaces, which may indicate packet loss, misconfiguration, or hardware issues. |
| Network Connections | Shows the number of active network connections, providing insight into system load and connectivity patterns. |
2.6.2 Data Insights
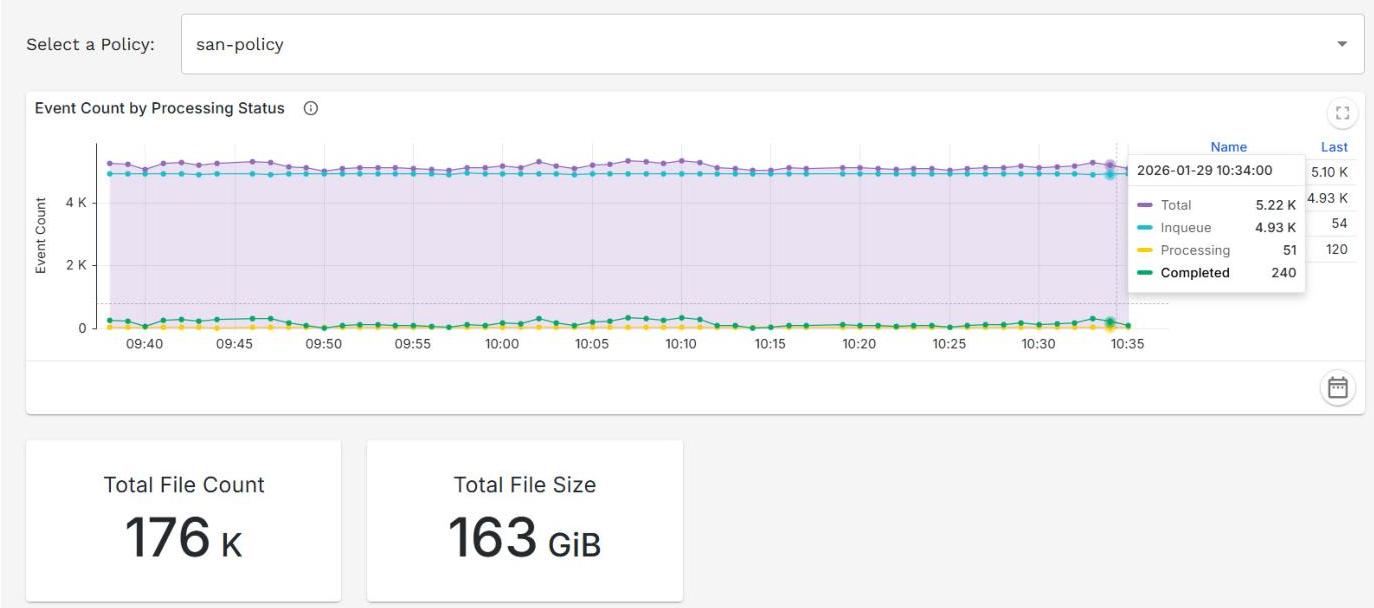
Data Insights in the Panzura Nexus Dashboard provides a consolidated view of the policy which displays graphs for following:
- Event Counts by Processing Status and total file count ingestion and total file size The chart illustrates time series chart displaying number of events categorized by processing status(processing, complete, and failed) over time, along with the overall event volume.
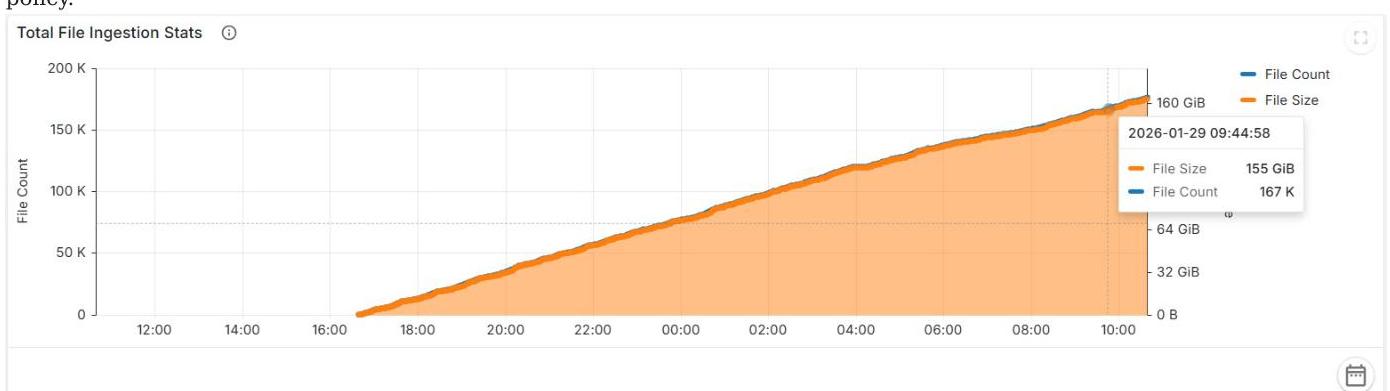
- Total File Ingestion Stats
The chart illustrates the time series showing the total count and size of files ingested into the Al systems for the selected
policy.
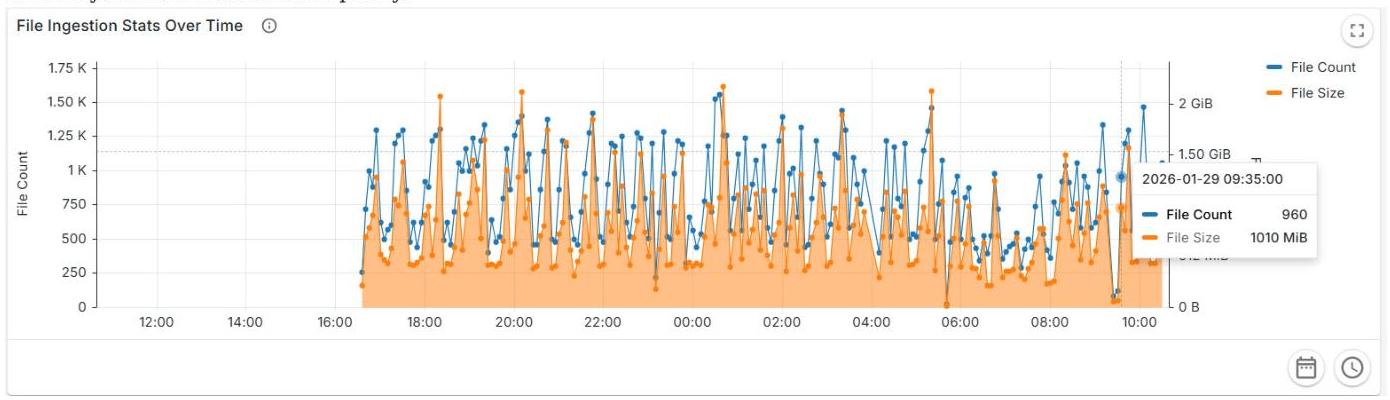
- File Ingestion Stats Over Time
The chart illustrates time series showing aggregated file count and file size over time based on the file ingestion activity into the AI system for the selected policy.
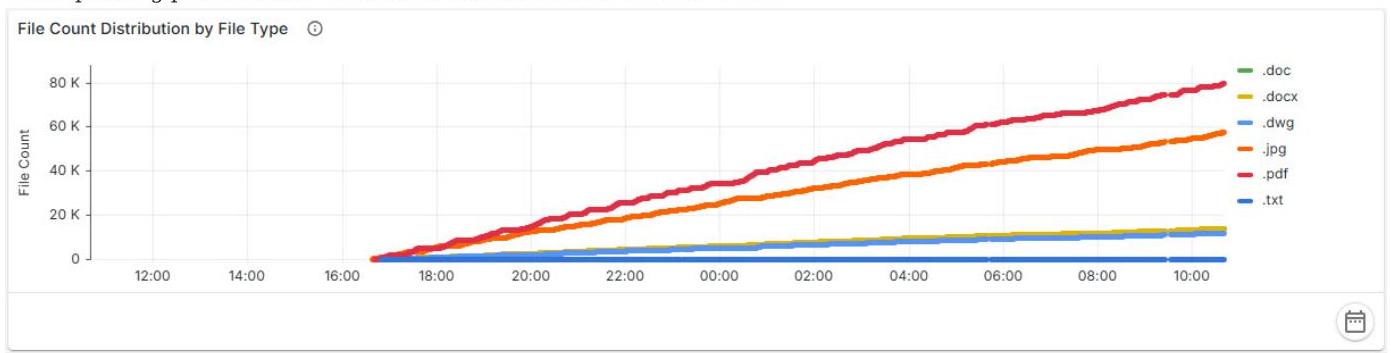
- File Count Distribution by File Type
The chart illustrates time series showing total file count across different file types for the selected policy, accompanied by corresponding pie charts for additional visualization on the dashboard.
- File Size Distribution by File Type
The chart illustrates the time series showing total file size across different file types for the selected policy, accompanied by corresponding pie charts for additional visualization on the dashboard.
File Size Distribution by File Type (1)

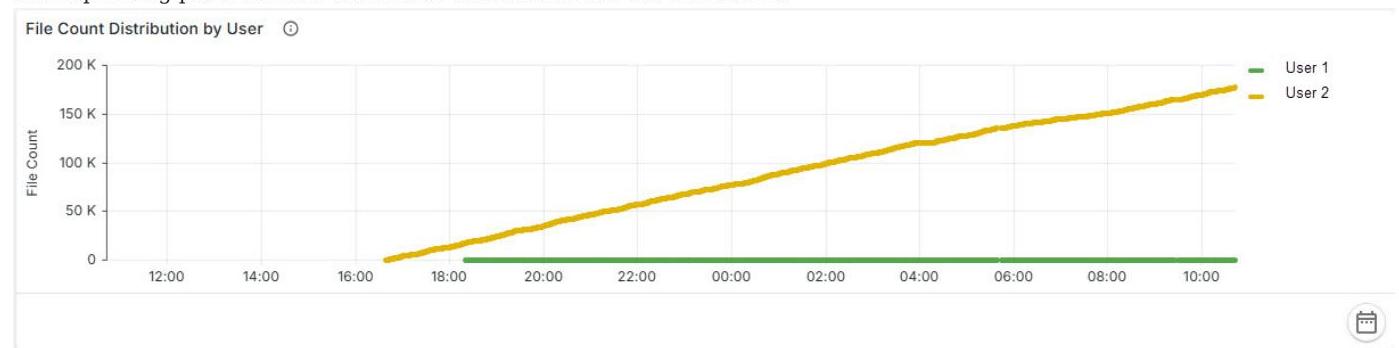
- File Count Distribution by User
The chart illustrates the time series of total file counts across different users under the selected policy, accompanied by corresponding pie charts for additional visualization on the dashboard.
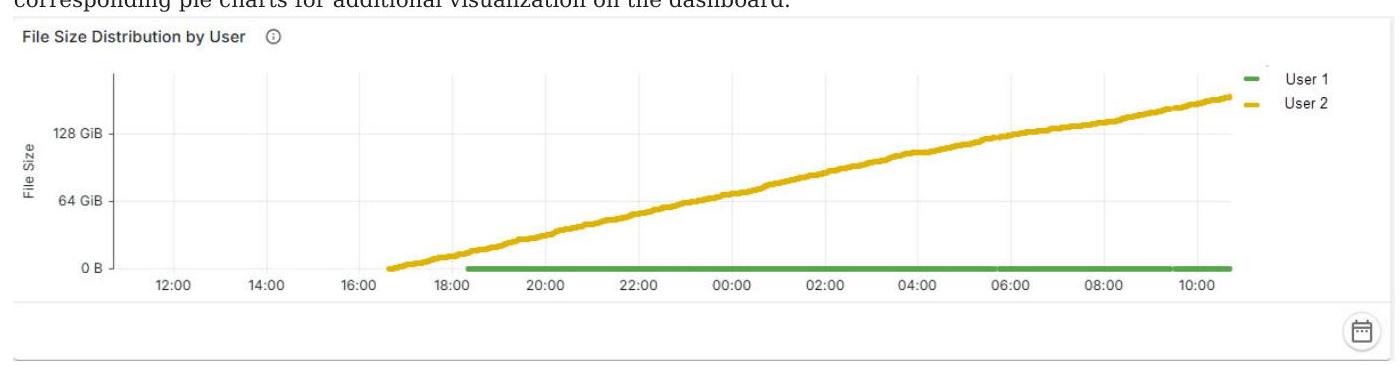
- File Size Distribution by User
The chart illustrates the time series showing total file size across different users for the selected policy, accompanied by corresponding pie charts for additional visualization on the dashboard.
2.7 Getting Started with Panzura Nexus Configuration
Panzura Nexus Web UI Configuration
Before starting with Panzura Nexus configuration, ensure the audit settings for CloudFS are in place. If not, refer to the section and make the settings.
- Login to the Panzura Nexus web UI and configure the CloudFS Storage plugin.
Refer to the Configure Storage Systems section. 2. Configure AI Systems - Microsoft Copilot Plugin.
Refer to the Configure AI Systems section. 3. Configure Identity Management.
Refer to the Configure Identity Management section. 4. Set up Rules and Data Insight policies: a. Rules: To create specific filters or criteria to determine which data should be processed. Refer to Configure Rules section b. Policies: A policy defines how CloudFS events are processed by applying configured plugins and rules to collect and upload data and metadata to Copilot. Refer to Configure Data Insight Policy section 5. After the policy is created, perform the following steps: a. Activate the policy by clicking the icon. b. Log in to the Microsoft cloud admin site with global administrator access. c. Search for the Connector name "Nexus" in the Connector list. d. Click "Give visibility to Copilot" and confirm. 6. To have conversation with the data ingested into Copilot, configure the chat agent using following steps. Refer to Configure Microsoft Copilot Agent section.
2.8 Panzura Nexus Plugin Configuration
Panzura Nexus requires specific configuration parameters to function correctly. Providing these details in the web UI enables seamless integration and secure access to data sources.
2.8.1 Configure Storage Systems
Click on " + " on the right-corner to create a producer plugin and provide the following master node and SMB connection details and review them in the Summary section:
Master Node Information
| Parameters | Description |
|---|---|
| Name | CloudFS plugin name. |
| Description | CloudFS plugin description. |
| CloudFS Master Node | Fully qualified domain name (FQDN) or IP address for |
| CloudFS master node. | |
| Note: If the domain name has .local, instead of using FQDN | |
| use IP address. | |
| CloudFS User | Administrator username. |
| Password | Administrator password. |
| CloudFS SMB Node | Hostname / IP address of the SMB node. |
| Note: If the domain name has .local, instead of using FQDN | |
| use IP address. | |
| Domain | Domain where CloudFS and Panzura Nexus are deployed. |
| SMB User | SMB username. |
| SMB Password | SMB user password. |
| SMB Connections | Number of SMB connections allowed. |
Note: When Nexus reads CloudFS file content or metadata, the file access time (atime) is not updated.
2.8.2 Configure AI Systems
This information is required for Panzura Nexus to create a Copilot connector, enabling both data and metadata ingestion. Click " + " on the right-corner to create consumer plugin and provide the Microsoft Copilot settings details. Review the details in Summary section:
| Parameters | Description |
|---|---|
| Name | Provide a user-friendly name for the Copilot plugin. |
| Description | Microsoft Copilot plugin description. |
| Tenant ID | The Tenant ID is obtained while enabling Microsoft 365 |
| Copilot licensing. This value is required for establishing | |
| secure integration between Nexus and Copilot. | |
| Client ID | The Client ID is generated during the application registration |
| process in Microsoft Entra ID. It is used to authenticate the | |
| Nexus connection. |
| Parameters | Description |
|---|---|
| Client Secret ID | The Client Secret is also created during application |
| registration in Microsoft Entra ID and is used along with the | |
| Client ID for secure authentication. |
2.8.3 Configure Identity Management
Click "+" on the right-corner to create IAM plugin to ensure that on-prem Active Directory identities remain synchronized with Microsoft Entra ID, enabling seamless authentication and access management. By configuring the Entra ID Connector, organizations can automatically provision and sync end-user privileges, allowing users to securely access CloudFS data insights through Copilot. This provides a unified identity experience across on-prem and cloud environments. Provide the Active Directory connection details:
| Parameters | Description |
|---|---|
| Name | Provide a user-friendly name for the Active Directory (AD) |
| integration. | |
| Description | Description of the AD configuration or purpose. |
| AD Domain Name | Fully qualified domain name (FQDN) of the Active Directory |
| domain. | |
| AD User | Username with permission to query and sync from Active |
| Directory. | |
| AD User Password | Password for the AD user account. |
| AD Host | FQDN or IP address of the Active Directory server. |
2.8.4 Configure Rules
A Rule defines the specific filters or criteria used to determine which data should be processed - for example, allowing only selected file types such as PDF or DOCX. Events that do not match the defined criteria are ignored.
Click "+" on the right-corner to create a rule. Provide the following details:
| Parameters | Description |
|---|---|
| Name | Name of the rule being created. |
| Description | Description of the rule and its purpose. |
| Select Criteria | Select the desired criterion from the dropdown to define |
| filtering conditions. | |
| Add Criterion | Adds a new criterion to the rule. Available Criterions are: |
| File Extension | |
| File Path pattern | |
| File Size | |
| File Timestamps | |
| Inclusive Criterion | When enabled, the selected criterions are included in the |
| rule. | |
| Add Another Criterion | Allows adding multiple criterions to refine the rule further. |
Rule Criterion: Several rule criterions can be created with extensions, path patterns, file size operators, timestamps types, date operators, etc.
| File Criterions | Parameters |
|---|---|
| File Extensions | Following extensions are supported |
- .docx, .doc, .txt, .pdf, .jpeg, .jpg, .jpe, jfif, .png, and .dwg. Note: Can enter their own specific extensions. | | File Path | Path Pattern - User PCRE to enter the file path pattern. Case Sensitive - When enabled, the path pattern mentioned should be acceptable. Inclusive Criterion - When enabled, the files that satisfy the rule are included. | | File Size | Size Operator - Supported file size are "Greater than", "Less than", "Equal to", and "between". Size Value - Min 1MB. | | File Timestamps | Timestamp Type - Created and Modified Note: "Accessed" type is not supported. Date Operator - Before, After, and Between Start Date - File timestamp. |
To edit an existing rule:
- From the Rules, click the Edit icon.
- Update the fields and save the changes.
To delete the rule:
- From the Rules, click the Delete icon.
- Click "Delete Rule" on the confirmation message. The rule is deleted.
2.8.5 Configure Policies
A Policy combines the configured plugins and associated rules to determine how incoming CloudFS events are processed. When an event occurs, the policy governs how data and metadata are collected and uploaded to Copilot based on the defined configuration. Note: Admin user should be able to map one or more policies to intended users and/or groups.
Click + in right-corner to create Data Insight Policy using details of the plugins (CloudFS and Microsoft Copilot) configured. This procedure is divided into 5 stages:
| Name | Description |
|---|---|
| Step 1- Select Plugins | |
| Name | Name of the policy being created. |
| Description | Description of the policy. |
| Source | Select source as the CloudFS plugin. |
| Destination | Select destination as the Copilot plugin. |
| Identity System | Select the Active Directory plugin. |
| Step 2- Configuration | |
| Restrict the file-system scope (Include Directories) | Copy the absolute share path of the CloudFS file owner node |
| starting with "/cloudfs/". For example, "/cloudfs/ | |
| fileowner_node/sharename" or "/cloudfs/fileowner_node/. | |
| This field accepts one or more values and is case-sensitive. | |
| Override Additional ACLs | Disable: The additional users and groups will be appended |
| to the existing ACL. |
| Enable: The existing ACLs will be overridden with Users and Groups selected. | |
|---|---|
| Users | The field is now searchable using a minimum of three characters of a SAM account name. The specified user(s) will have access to all the data ingested in Microsoft Copilot. Note: To avoid file ingestion failures caused by file-system ACLs, use an additional user account that is synced to Entra ID. |
| Groups | The field is now searchable using a minimum of three characters of a SAM account name. Note: To ensure all domain users can access the ingested data, search and add the 'Everyone' group to the group mapped to the AD 'Domain Users' group. |
| Parse Documents with OCR | When enabled, the Optical Character Recognition (OCR) images included in the .docx and .pdf files will also be parsed. Note: This parameter is disabled by default. |
| Step 3- Define Rules | |
| Rules and Groups | The existing rules are listed here. Using the "+" button, new rules can be created. Drag the required rules to create a group for the policy. |
| Step 4- Schedule | |
| Scheduling Options | Live Access Monitoring: Monitors real-time events, updates, data, and metadata changes on the file system. This parameter is enabled by default. Schedule Incremental Scan: The policy scan can be scheduled using the following parameters. They appear when the checkbox is selected. - Minute - Hour - Day - Month - Weekday Note: By default, newly created policy is in "Inactive" state. |
| Step 5- Summary | Review all details provided while creating the policy and click Submit to save the changes. |
Note: The AI Systems Connector name is displayed. Once the policy is activated, a Connector is created in the AI system (viz: Microsoft Copilot) with the name <Panzura-Nexus-policy-id>. This Connector is unique to each policy, and all the data will be ingested into this Connector. Refer to the screenshot.
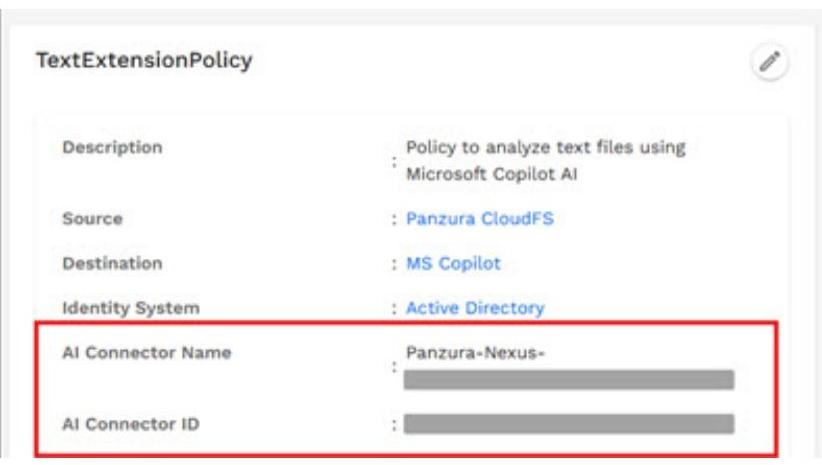
Important note: Do not alter the Connector name within the AI System. Any modification will immediately invalidate the Connector and prevent it from functioning properly.
Following operations can be performed on the policy:
| File Criterions | Parameters |
|---|---|
| Activate | Once the policy is created, activate using the icon to be operational. Activating the policy will start all the components and microservices. |
| Activating a policy has following parameters: | |
| Activate in Dry Run Mode - This option is used as a precheck for any new rules/policies created to check for the files are getting filtered correctly. Note that, no data is ingested in Microsoft Copilot. | |
| Start immediate full scan - To start the full scan of files immediately only if no other scan is already running. Note: When a new policy is created and activated for the first time, it integrates with the Microsoft website to create a connector, which may take some time. | |
| Start Scan | This option is disabled when the policy is created. After activating the policy, this option is enabled. Start scan comprises of two scan options: |
| Full Scan - Scans all the files available on the SMB share. | |
| Incremental Scan - Scan the files that were modified, created or had ACL changes, since the last scan. | |
| Delete Policy | A confirmation message appears and by enabling the "I acknowledge" toggle button, the policy can be deleted. |
| Close | It closes the Actions panel. |
| Deactivate | This option is available only when the policy is active and it needs to be deactivated. |
Edit the policy
Using the Edit icon, you can make updates to the existing policy.
- Click on policy which needs to be updated.
- Using the Edit icon on the right-corner, make the required changes to the policy and click Save.
Notes:
The following points are with respect to any changes made to the policy and when the policy is effective:
- Any changes made to the policy are saved automatically; there is no need to deactivate and re-activate the policy.
- Policy updates cannot be made while an active scan is running on the policy.
- Updating rules associated with an active policy moves the policy into an updating state. Changes made in the Configuration tab take effect immediately.
- Override Additional ACLs when enabled will override the User and Groups provided while configuring the policy.
- Any changes to the policy or previously ingested files will take effect only after a full scan is executed.
- Only one plugin configuration should be created per CloudFS ring. Creating multiple plugin configurations from the same CloudFS ring can result in policies being stuck in the "Activating" state.
Delete the policy:
Click on the Delete icon to remove the policy.
2.9 Panzura Nexus Statistics
Provides a centralized interface for monitoring system activity, data ingestion, and operational events. It offers visibility into realtime processing, audit events, alerts, jobs, and reports, enabling administrators to track system behavior and respond to conditions efficiently.
2.9.1 Jobs
The Jobs page displays current and scheduled jobs and processes executed in the system. It enables administrators to track job execution, review outcomes, and troubleshoot issues by providing detailed timing, status, and message information for each job.
Job page displays manual scans, schedule scans, policy deletion jobs, report and audit export / download/ pdf/cvs/json.
Current tab
Each job entry in Current tab includes the following:
| Column | Description |
|---|---|
| Job Name | Name of the Job on which the operation is performed. |
| Message | Describes the operation performed or the reason for job |
| completion or cancellation. | |
| Scheduled Time | The date and time when the job was scheduled to run. |
| Status | Indicates the job outcome, such as Succeeded or Cancelled. |
| Status consists of following fields: Enqueued, Running, | |
| Cancelled, Succeeded, Failed, Timedout, and Paused. | |
| Start Time | The actual date and time when the job execution began. |
| End Time | The date and time when the job completed or was stopped. |
The right pane provides tools to help manage and analyze job records:
| Action | Description |
|---|---|
| Filters | Narrow down jobs based on criteria such as status or time. |
| Refresh | Reloads the job list to display the latest updates. |
| Enter Full Screen | Expands the view for easier monitoring of jobs. |
| Toggle Columns | Shows or hides columns to customize the table layout. |
Actions on Jobs
The Nexus web UI allows administrators to pause, resume, or cancel job execution as needed. These actions are available only on a scanned job.
- Pause: Temporarily halts a running job. This can be useful if system resources need to be reallocated or if an operation must be temporarily stopped without cancelling it.
- Resume: Restarts a paused job from the point where it was halted, allowing the job to continue processing without starting over.
- Cancel: Only jobs with a status of "Paused" can be cancelled using this option. Jobs with a status of "Cancelled", "Failed", or "Succeeded" cannot be cancelled.
These controls give administrators flexibility in managing long-running or resource-intensive jobs. Note: The Pause, Resume, and Cancel options are not available for Backup jobs.
Scheduled tab
This tab displays different status of the job in a Calendar format. Types of status are: Elapsed, Cancelled, and Scheduled.
| Job | CURRENT SCHEDULED | |||||||||
|---|---|---|---|---|---|---|---|---|---|---|
| ( March 2026 | Elapsed | Scheduled | Cancelled | |||||||
| Sun | Mon | Tue | Wed | Thu | Fri | Sat | ||||
| 1 | 3 | 3 | 4 | 5 | 6 | 7 | ||||
| 8 | 9 | 10 | 11 | 12 | 13 | 14 | ||||
| 15 | 16 | 17 | 18 | 19 | 20 | 21 | ||||
| 23 | 23 | 24 | 26 | 27 | 28 | |||||
| 29 | 30 | 31 |
2.9.2 Reports
The Reports section provides summarized insights and structured outputs that support review, compliance, and operational analysis. It allows administrators to generate and view detailed reports based on selected policies and scans.
Data Insights Policy - Scan Report
The Scan Report displays results for a selected Policy Name and Scan, presenting file-level insights generated during policy scans.
To view the Scan Report:
- Select a Policy Name from the Select Scan panel.
- Choose the corresponding Time and click Fetch Report Data. The report data is displayed in the main table view.
The Scan Report table describes the following:
| Column | Description |
|---|---|
| File Path | Displays the location of the file identified during the scan. |
| File Size | Indicates the size of the file included in the report. |
| Created Date | Indicates the date of the file created. |
| Status | Indicates the status of the report. |
| Status of the reports are: Completed, Failed, In progress, | |
| Pause, and Cancelled |
The following tables describe the details of the controls on the Reports Categories.
| Controls | Description |
|---|---|
| Search | Searches within the report results displayed on the page. |
| Open Filters > Policy Name Selector | Allows selection of a policy to view its associated scan |
| reports. | |
| Scan Selector | Enables selection of a specific scan for the chosen policy. |
| Close Panel | Closes the Select Scan panel. |
Actions on the Scan report available for that report are:
| Parameters | Description |
|---|---|
| Export Options | Export options are PDF, CSV, and JSON |
| Refresh All | Refresh all the rows. |
| Enter Fullscreen | Displays a full screen view of the report. |
| Toggle columns | Add and remove columns as required. |
Data Insights Policy - Catalog Items
Catalog Items refer to the set of files ingested into AI systems that can be selected for deletion. Each Catalog Item displays following:
| Parameters | Description |
|---|---|
| File Path | Displays the location of the file identified during the scan. |
| MIME Type | Indicates the format of a file or data. |
| File Size | Indicates the size of the file included in the report. |
| Created Date | Indicates the created date of the item. |
| Modified Date | Indicates the modified date of the item. |
These attributes are shown in the context of the selected policy, allowing users to manage and remove specific items as needed. Additional metadata columns are available through the "Toggle Columns" option in the upper-right corner of the Catalog page. These columns provide detailed information about ingestion status, scan history, file ownership, access control processing, and storage location for each catalog item.
| Parameters | Description |
|---|---|
| File Path | Displays the location of the file identified during the scan. |
| MIME Type | Indicates the format of a file or data. |
| File Size | Indicates the size of the file included in the report. |
| Created Date | Indicates the created date of the item. |
| Modified Date | Indicates the modified date of the item. |
| Ingestion State | Indicates the status of the ingestion process for the catalog |
| item. Failed or Partial success state indicates that one or | |
| more ACL entries could not be resolved because the | |
| associated users or groups are not synchronized to Microsoft | |
| Entra ID. |
| Parameters | Description |
|---|---|
| Error Message | Displays details about the error encountered during ingestion. |
| Failed ACLs | Displays the unresolved ACL entries that caused the ingestion failure. |
| Note: Failed ACLs containing SIDs associated with wellknown RIDs below 1000 are no longer displayed in Microsoft Entra ID, as these identities are not expected to exist in Entra ID. | |
| Checksum | Displays the checksum value used to verify file integrity. |
| Last Ingested Date | Indicates when the item was last ingested. |
| Last Scan Type | Indicates the type of scan that last processed the item. |
| Last Scan ID | Displays the unique identifier of the last scan. |
| Last Modified By | Indicates the user who last modified the item. |
| User | Displays the user associated with the item. |
| Group | Displays the group associated with the item. |
| Storage Node | Displays the storage location where the item resides. |
To view the Catalog Items:
- Select a Policy Name from the Select Scan panel.
- Choose the corresponding Time and click Fetch Report Data. The report data is displayed in the main table view.
To delete the Catalog Items:
- Select catalog item(s) from the table.
- Click on the Delete icon to delete the Catalog Item.
To view the ACL permission: ACL permission is the permission granted to individual files and groups.
- On the Data Insights Policy - Catalog, click on the "View Access Permissions" icon.
- A pop-up opens which displays the path of the file and read access granted to individuals or groups.
Access Permissions
/cloudfs/tt-nexus-mnode/mshare/Perf Data S...Resumes PDF/Accountant/t.pdf
Read Access Granted Tabasum Tamboli dl-eng
2.10 Panzura Nexus Configuration
Configuration section provides access to system-level options that control how the application operates. It allows administrators to manage and customize core functionalities to ensure the system works according to organizational requirements.
2.10.1 Settings
The Settings option under Configuration is used to define and manage specific system parameters. This includes configuring features such as email server details, authentication options, and other operational preferences required for system monitoring and notifications.
License Management
Nexus requires a valid license to operate. Licensing for Nexus is based on the source storage file system capacity (for example, Managed Capacity (MC) in a CloudFS deployment).
Key principles for Nexus license management:
- License is primarily tied to storage system capacity (e.g., CloudFS managed capacity).
- Additional license types (such as AI request quota or user/node limits) are supported through the same token format.
- Licensing is enforced using a token string mechanism that you register in the Nexus System Management UI.
- If a valid license is not present or is invalid, Nexus raises a critical alert and may change behavior depending on the configured enforcement model.
ABOUT LICENSE TOKEN
Nexus uses a token-based license key:
- The license is an alphanumeric encrypted string with a fixed length of 32 bytes (before encoding) and is presented as a 49-character Base32 string for administrators.
- The token encodes:
- Product identifier.
- License type (capacity, AI requests, users, nodes, etc.).
- License value (e.g., TB, requests/month).
- Environment (Dev, Eval, Prod).
- Expiry information.
- System binding information (system ID hash).
- Reserved space for future attributes.
INSTALLING LICENSE FROM WEB UI
Prerequisites:
- Contact Panzura Support / Sales team to get access to the license key.
How to install (add) license
- Click Install License to install license when installing it for the first time or click "+" to open Install License pop-up.
- Paste the license key into the License Key field and click Install. The license key is added in the table.
The License Management tables displays the following parameters:
| License Status | Key | Type | Capacity | Expiry Date |
|---|---|---|---|---|
| Red / Green | License key format | |||
| XXXX-XXXXXXXX- | ||||
| XXXXXXXX- | Storage Unit | |||
| Managed Capacity | Greater than or | |||
| equal to Storage | ||||
| Systems Capacity | Date, HH:MM:SS |
| License Status | Key | Type | Capacity | Expiry Date |
|---|---|---|---|---|
| XXXXXXXX- XXXXXXXX- XXXXXXXX |
License Status: RED - Indicates that the license is expired. GREEN - Indicates that license is valid. Alerts for License Management The following alerts are generated in Alerts Management >> Live or Historical.
- License is not installed.
- License key is expired.
- If Storage Systems capacity exceeds the license token.
Note: Add a new token when you want to extend the capacity or it is expired.
Email Notifications
This section allows administrators to configure SMTP details for sending system alert notifications via email. In this configuration, SMTP authentication is enabled to ensure secure access to the mail server.
Email Notifications fields consists of following fields:
| Parameters | Description |
|---|---|
| SMTP Server | Enter the hostname or IP address of the SMTP server used to send alert emails. |
| SMTP Port | Specify the port number used by the SMTP server. |
| Sender Email Address | Enter email address to receive alert notifications. |
| Username / Password | - Enter the username for SMTP server authentication. - Enter the password associated with the SMTP username. |
| Receiver Email Address | Enter one or more email addresses to receive alert notifications. |
| Use Encryption | Enable to encrypt outgoing emails using SMTPS. |
After submitting the configuration, a summary is displayed with Send Test Email. You can test the connection.
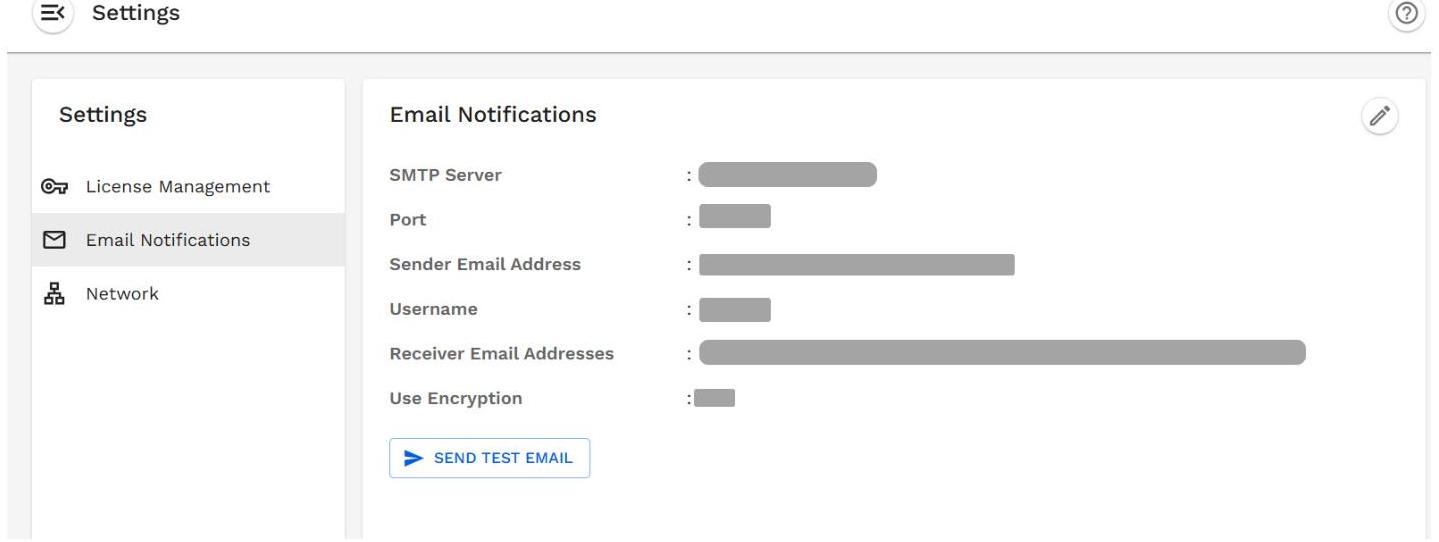
Network Configuration
The Network Configuration consists of following parameters:
| Parameters | Description |
|---|---|
| System Configuration | - Hostname - FQDN |
| LAN Configuration | - LAN Interface - IP Assignment - LAN IP Address - LAN Subnet Mask - LAN Gateway - LAN MTU - Primary DNS - Secondary DNS |
| WAN Configuration | - Use same as LAN Note: Select "Use same as LAN" to apply LAN settings to WAN traffic, or configure a dedicated WAN interface if your deployment requires separate network settings. |
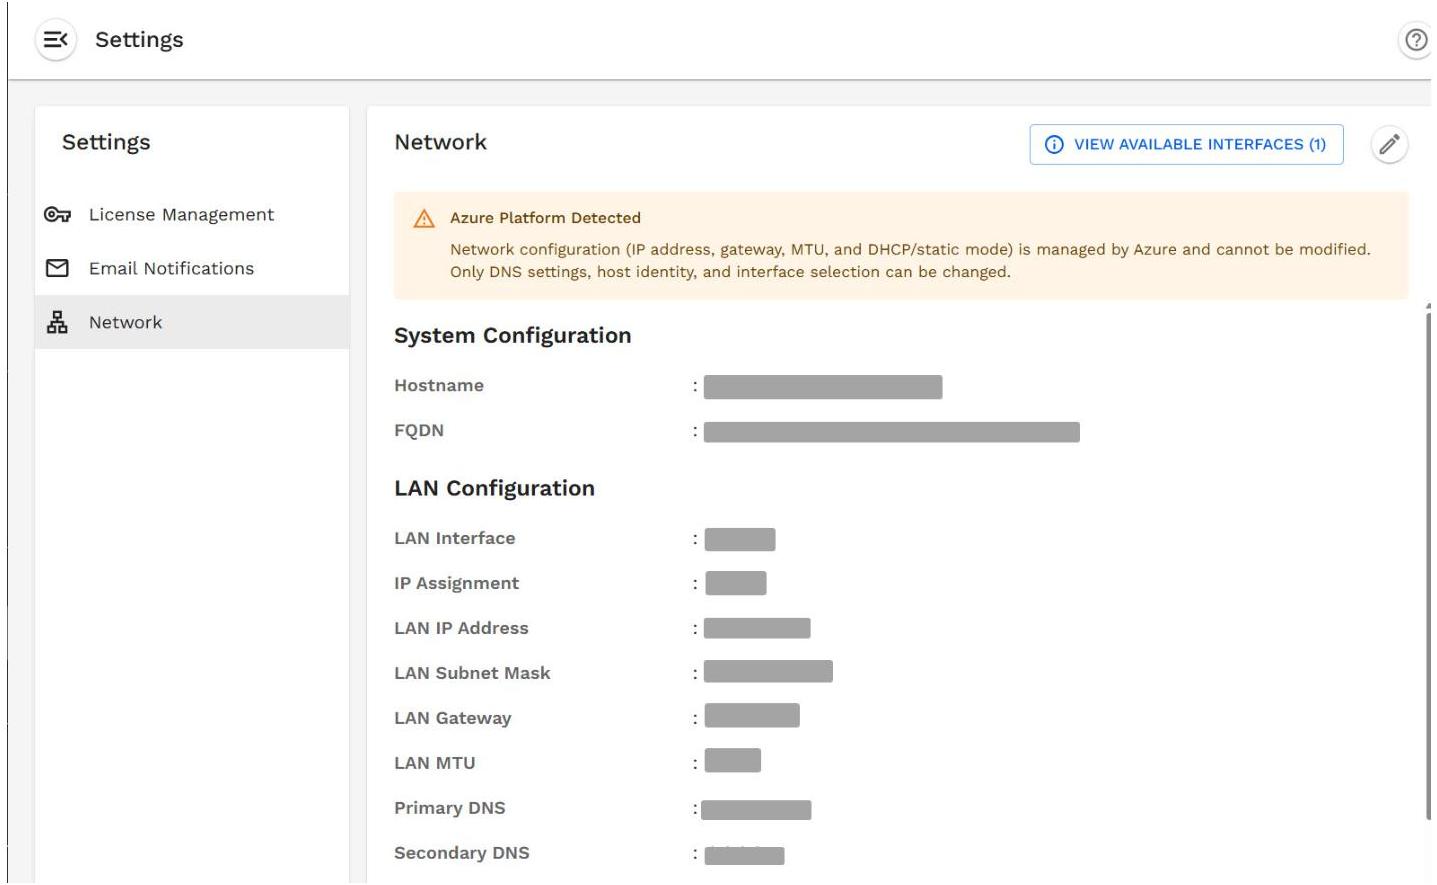
Note: Modifying the Network configuration will restart all Nexus services, which may cause a brief interruption in system operations.
Edit Network Configuration
The Network Configuration configured during setup wizard can be updated using the Edit icon.
View Available Interfaces
The Available Interfaces display details such as:
- Interface
- Type
- IP Address
- Subnet Mask
- Gateway
Available Network Interfaces (1)
| Interface | Type | IP Address | Subnet Mask | Gateway |
|---|---|---|---|---|
Preferences
The Preferences section allows administrators to configure system-wide settings that enhances user experience and optimize system behavior.
| Parameter | Description |
|---|---|
| Log Level | Select the desired verbosity for system logs. Available options include: - DEBUG - INFO - WARN - ERROR This setting controls the level of detail recorded in logs across all system components, such as the engine, web server, and plugins. Changing the log level takes effect system-wide. |
| Session Timeout | Specify how long a user session remains active before requiring re-login. The value is set in days and applies to all users. Changes to this setting take effect immediately for all active sessions, enhancing security by ensuring sessions do not remain open indefinitely. These preferences help administrators tailor system behavior and security according to organizational needs. |
| Local Backup Retention | Specifies the maximum number of local backups that are kept. The default value is 5 . If this limit is exceeded, the oldest local backup is automatically deleted. |
| Cloud Backup Retention | Specifies the maximum number of cloud backups that are kept. The default value is 10 . If this limit is exceeded, the oldest cloud backup is automatically deleted. |
NTP Configuration
The NTP (Network Time Protocol) Configuration section allows administrators to set the system's time synchronization parameters. Accurate timekeeping is essential for system operations, event logging, and security.
| Parameter | Description | Example |
|---|---|---|
| NTP Servers | Specify the NTP server(s) that the | |
| system will use to synchronize its | ||
| clock. | time.google.com | |
| System Timezone | Set the system's timezone to ensure | |
| that all logs, scheduled tasks, and | ||
| timestamps reflect the correct local | ||
| time. The timezone is displayed in | ||
| standard format. | America/Los_Angeles |
These settings are editable and can be adjusted as needed to maintain consistent and accurate time across all system components.
Note: Modifying the NTP configuration will restart all Nexus services, which may cause a brief interruption in system operations.
2.10.2 Register the application in Microsoft Entra ID
Follow the steps to register the application in Microsoft Entra ID:
- Login to Microsoft cloud services website using admin credentials.
- Navigate to Admin center > All admin centers > Microsoft Entra which redirects to the Microsoft Entra admin console.
- From the left-side menu, Entra ID > App registrations > Owned applications tab > click +New registration. Provide the following details to create the application:
- Name: A display name to the app.
- Select "Accounts in this organizational directory only (org_name only - Single tenant)".
- Click Register. The application is created. From the Overview of the created application, note the following: Tenant ID Client ID (Application ID).
- From the left menu, under Manage > API permissions, click +Add a permission.
- A new pane titled "Request API permissions" opens. Select Microsoft Graph, then choose Delegated permissions and add the required permissions. Next, select Application permissions and add the necessary permissions. Use the permissions listed in the following tables:
Delegated permissions
Permission name ExternalItem.Read.All Files.Read.All Sites.Read.All User.Read
Application permissions
Permission name AiEnterpriseInteraction.Read.All AppCatalog.ReadWrite.All ExternalConnection.ReadWrite.All ExternalItem.ReadWrite.All
Permission name
Group.Read.All
User.Read.All
Application.ReadWrite.All
Organization.Read.All 4. Click "Grant admin consent for (org_name)". Click Yes on the confirmation message. The status is updated against each permission. 5. Navigate to Manage > Certificates & secrets > Client secrets tab. Click "+New client secret". Provide a user-facing Name to the client secret and select the Expires value from the dropdown. Note: The client secret expires and can be configured for a maximum of 2 years. 6. The client secret is displayed in the table. Note the "Value" using "Copy to clipboard". The "Value" is the Client Secret, and this value is required while configuring AI Systems in Nexus.
Refer to the following links for more details: License options for Microsoft 365 Copilot Register an application in Microsoft Entra ID Add and manage application credentials in Microsoft Entra ID Add permissions to access Microsoft Graph
2.10.3 Agents
This topic covers the step-by-step manual guidance to set up Microsoft Custom Connector and register the app in the Entra ID.
Configure Microsoft Copilot Custom Agent (Manually)
This Microsoft Copilot Custom Agent allows users to search and explore files ingested in Panzura Nexus using natural language. It helps quickly find relevant information and get meaningful answers from stored content.
Note: The following procedures describe how to configure a custom agent using Microsoft Copilot. Ensure all prerequisites are met before you begin.
Prerequisites:
- Before performing this procedure, make sure that the following parameters are kept handy. Refer to the section to Register the application in Microsoft Entra ID to get the following parameters.
- Tenant ID
- Client ID
- Client secret
- AI Connector ID: Note this ID from Nexus web UI > Policies.
- You need access to the following portals:
- Azure Entra ID
- Microsoft Copilot Studio
- Microsoft 365 Copilot
- Microsoft Cloud Admin for approving the agent
Important Note: The setup requires navigating between multiple browser sessions and includes several transitions between steps. Do not close any of the browser sessions during the process, and read the instructions carefully to ensure each step is followed in the correct order.
A. Steps to create Custom Connector
On the Custom Connector page, perform the following actions:
- Navigate to Microsoft Copilot Studio.
- Click "Tools" from the menu on the left pane.
- Click "+ New Tool" > Select Custom Connector.
- Click "+ New custom Connector" and select Create from Blank.
- On the General tab, provide the following details:
- Connector Name: (pre-filled)
- Description: Provide the description
- Scheme: HTTPS
- Host: graph.microsoft.com
- Click the Security tab and configure:
- Authentication type: OAuth 2.0
- Identity Provider: Azure Active Directory
- Client ID, Client secret, Tenant ID
- Resource URL: https://graph.microsoft.com
- Enable on-behalf-of login: true
- Scope: User.Read Files.Read Sites.Read.All, ExternalItem.Read.All
- Redirect URL: Generated after clicking Create Connector. Make a note of this URL. Click Create Connector.
Note: Do not switch to another tab without clicking Create Connector. Otherwise, values entered in the Security tab may be lost. You will have to come back to this site after executing steps 5-9. 7. Log in to Microsoft Entra ID and navigate to:
Entra ID > App registrations.
- Locate the app created in Register the application in Microsoft Entra ID.
- Click Authentication > "Redirect URI configuration" tab.
- Click the + Add Redirect URI. A new pane opens on the right side to select a platform. Click Web and add the copied Redirect URL. Do not delete the URLs that are already present.
- Click Configure. Exit from the Microsoft Entra ID portal.
- Go back to the make.powerapps.com tab where you were in step 4 and click the Definition tab. Enable the Swagger editor. Remove existing content and paste the following Swagger definition: Note: This is a long block of code. Scroll down carefully as you might miss a step, an instruction or an important note.
swagger: '2.0'
info:
    title: panzura-nexus-conn-schema-v03
    description: Retrieve results from Panzura CloudFS
    version: '1.0'
x-ms-connector-metadata:
    - propertyName: Website
    propertyValue: https://panzura.com
    - propertyName: Privacy policy
    propertyValue: https://panzura.com/privacy-policy
    - propertyName: Categories
    propertyValue: Standard
    - propertyName: iconBackground
    propertyValue: '#40E0D0'
host: graph.microsoft.com
basePath: /
schemes:
    - https
consumes:
    - application/json
produces:
    - application/json
paths:
    /v1.8/search/query;
    post:
    operationId: SearchNexus
    summary: Search Nexus Data
    description: Retrieve results from Panzura CloudFS
    parameters:
        - name: body
        in: body
        required: true
        schema:
            $ref: '#/definitions/SearchRequest'
            x-ms-description: Search query parameters
            x-ms-summary: Search Request
    responses:
        '200':
        description: Success
        schema:
            type: object
            properties:
                value:
                    description: value
                    type: array
                    items:
                    type: object
                    properties:
                    searchTerms:
                    description: searchTerms
                    type: array
                    items:
                    type: string
                    hitsContainers:
                    description: hitsContainers
                    type: array
                    items:
                    type: object
                    properties:
                    hits:
                    description: hits
                    type: array
                    items:
                    type: object
                    properties:
                    hitId:
                    description: hitId
                    type: string
                    contentSource:
                    description: contentSource
                    type: string
                    rank:
                    description: rank
                    type: integer
                    format: int32
                    summary:
                    description: summary
                    type: string
                    resource:
                    description: resource
                    type: object
                    properties:
                        '@odata.type':
                    description: '@odata.type'
                    type: string
                    x-ms-client-name: odataType
                    properties:
                    description: properties
                    type: object
                    properties:
                    documentId:
                    type: integer
                    format: int32
                    description: documentId
                    fileID:
                    type: string
                    description: fileID
                    hitHighlightedProperties:
                    type: string
                    description: hitHighlightedProperties
                    id:
                    type: string
            description: id
                    immutableEntryId:
                    type: string
                    description: immutableEntryId
                    label_FileExtension:
                    type: string
                    description: label_FileExtension
                    label_FileName:
                    type: string
                    description: label_FileName
                    label_LastModifiedBy:
                    type: string
                    description: label_LastModifiedBy
                    label_LastModifiedDateTime:
                    type: string
                    description: label_LastModifiedDateTime
                    label_Title:
                    type: string
                    description: label_Title
                    label_URL:
                    type: string
                    description: label_URL
                    owner:
                    type: string
                    description: owner
                    path:
                    type: string
                    description: path
                    substrateLocationId:
                    type: string
                    description: substrateLocationId
                    url:
                    type: string
                    description: url
                    total:
                    description: total
                    type: integer
                    format: int32
                    moreResultsAvailable:
                    description: moreResultsAvailable
                    type: boolean
            '@odata.context':
            description: '@odata.context'
                type: string
                x-ms-client-name: odataContext
            x-ms-examples:
            application/json:
                value:
                    value: []
                    '@odata.context': https://graph.microsoft.com/v1.0/$metadata#search
            '400':
            description: Bad Request
            default:
            description: Error
            consumes:
            - application/json
            produces:
            - application/json
x-ms-description: Retrieve results from Panzura CloudPS
x-ms-examples:
            application/json:
                value:
                    query: query string
                    filter: ''
                    size: 50
                    offset: 0
                    contentSource: /external/connections/nexus
x-ms-summary: Search Nexus Data
x-ms-visibility: important
/v1.0/external/connections/{connection-id}/items/{item-id}:
get:
    operationId: GetExternalItem
    summary: Get External Item In Chunks
    description: =-
        Retrieve an external item in chunks to handle large files. Each call
        returns a portion of the content.
    parameters:
    - name: connection-id
        in: path
        description: The ID of the external connection
    required: true
    type: string
    x-ms-summary: Connection ID
    x-ms-visibility: important
    - name: item-id
    in: path
    description: The ID of the external item
    required: true
    type: string
    x-ms-summary: Item ID
    x-ms-visibility: important
    - name: chunk
    in: query
    description: >-
        The chunk index to retrieve (0-based). Required for chunked
        retrieval.
    required: true
    type: integer
    format: int32
    minimum: 0
    default: 0
    x-ms-summary: Chunk Index
    x-ms-visibility: important
    - name: chunkSize
    in: query
    description: >-
        Size of each chunk in bytes. Default is 76000 (75KB). Minimum 1024,
        maximum 10485760 (10MB).
    required: false
    type: integer
    format: int32
    minimum: 1024
    maximum: 10485760
    default: 76000
    x-ms-summary: Chunk Size (bytes)
    x-ms-visibility: advanced
    - name: useChunking
    in: query
    description: >-
        Enable or disable chunking. When false, returns full item like the
        non-chunked endpoint.
    required: false
    type: boolean
    default: true
    x-ms-summary: Enable Chunking
    x-ms-visibility: advanced
    - name: $select
    in: query
    description: OData $select query parameter to specify properties to return
    required: false
    type: string
    x-ms-summary: Select Properties
    x-ms-visibility: advanced
responses:
    '200':
    description: Success - Returns a chunk of the external item
    headers:
    X-Item-Chunk-Index:
        type: integer
        format: int32
        description: The chunk index returned
    X-Item-Total-Chunks:
        type: integer
        format: int32
        description: Total number of chunks available
    X-Item-Is-Last-Chunk:
        type: boolean
        description: Whether this is the last chunk
    X-Item-Chunk-Size:
        type: integer
        format: int32
        description: Size of this chunk in bytes
    X-Item-Total-Size:
        type: integer
        format: int32
        description: Total size of the content in bytes
    schema:
        $ref: '#/definitions/ChunkedExternalItemResponse'
    x-ms-examples:
        application/json:
        value:
            id: '12345'
            properties:
            fileExtension: .pdf
            fileName: doc.pdf
            fileSize: 1824800
            lastModifiedDateTime: '2024-01-15T10:30:00Z'
            owner: [email protected]
            path: /documents/doc.pdf
            title: Large Document
            url: https://example.com/doc.pdf
            acl:
                type: user
                    value: [email protected]
                    accessType: grant
            content:
            type: text
            value: First 75000 of the document content...
            isPartial: true
            chunkInfo:
                startByte: 0
                endByte: 102399
                chunkIndex: 0
                totalChunks: 10
                charsInChunk: 75000
            chunkMetadata:
                chunkIndex: 0
                chunkSize: 76800
                totalChunks: 14
                isLastChunk: false
                chunkingEnabled: true
                totalSizeBytes: 1024800
                originalContentLength: 1250000
                '@odata.type': '#microsoft.graph.externalItem'
    '400':
    description: Bad Request - Invalid chunk parameters
        schema:
            type: object
            properties:
                error:
                    type: object
                    properties:
                    code:
                        type: string
                        enum:
                            - InvalidChunkIndex
                            - InvalidChunkSize
                    message:
                        type: string
    '404':
    description: Item not found
        schema:
            type: object
            properties:
                error:
                    type: object
                    properties:
                    code:
                        type: string
                    message:
                        type: string
    default:
        description: Error
    x-ms-description: >
        Retrieve large external items in manageable chunks to avoid size
        limitations
    x-ms-summary: Get External Item In Chunks
    x-ms-visibility: important
definitions:
SearchRequest:
type: object
required:
    - query
    properties:
    query:
    description: query string
    type: string
    x-ms-visibility: important
    filter:
    description: Key:value pair composed with and-or conditions
    type: string
    default: ''
    size:
    description: size
    type: integer
    format: int32
    default: 50
    offset:
    description: offset
    type: integer
    format: int32
    default: 0
    contentSource:
    description: external content source
    type: string
    default: /external/connections/nexus
    example:
    query: query string
    filter: ''
    size: 50
    offset: 0
    contentSource: /external/connections/nexus
ChunkedExternalItemResponse:
    type: object
    properties:
    id:
    description: The unique identifier of the item
    type: string
    properties:
    description: The properties of the external item
    type: object
    additionalProperties: true
    acl:
    description: Access control list for the item
    type: array
    items:
        type: object
        properties:
            type:
                type: string
                enum:
                    - user
                    - group
                    - everyone
            value:
                type: string
            accessType:
                type: string
                enum:
                    - grant
                    - deny
    content:
    description: Chunked content of the external item
    type: object
    properties:
        type:
            type: string
            description: Content type (e.g., text, html)
        value:
            type: string
            description: The chunked content value
            isPartial:
                type: boolean
            description: Indicates if this is a partial content chunk
            chunkInfo:
                type: object
            properties:
                startByte:
                    type: integer
                    format: int32
                    description: Starting byte position of this chunk
                    endByte:
                        type: integer
                        format: int32
                        description: Ending byte position of this chunk
                    chunkIndex:
                        type: integer
                        format: int32
                        description: The index of this chunk (0-based)
                    totalChunks:
            type: integer
                format: int32
                description: Total number of chunks
                charsInChunk:
                    type: integer
                    format: int32
                    description: Number of characters in this chunk
    activities:
    description: Activities associated with the item
    type: array
    items:
        type: object
    chunkMetadata:
    description: Metadata about the chunking operation
    type: object
    properties:
        chunkIndex:
            type: integer
            format: int32
            description: The chunk index returned
            chunkSize:
                type: integer
                    format: int32
                    description: Size of each chunk in bytes
            totalChunks:
                type: integer
                format: int32
            description: Total number of chunks
            isLastChunk:
                type: boolean
            description: Whether this is the last chunk
            chunkingEnabled:
                type: boolean
            description: Whether chunking is enabled
            totalSizeBytes:
                type: integer
                format: int32
                description: Total size of the content in bytes
            originalContentLength:
                type: integer
                format: int32
            description: Original content length in characters
    '@odata.type':
        description: OData type
Note: As soon as the code is pasted in Swagger, two methods are displayed on the right side under default:
- POST: Search Nexus Data
- GET: Get External Item in Chunks
Disable the Swagger editor toggle. You are directed to Power apps again, scroll down and the click Code.
- On to the Code tab, toggle the Code Disabled and enable it. Paste the following code and click Update connector to deploy it.
using System;
using System.Net;
using System.Net.Http;
using System.Threading.Tasks;
using Newtonsoft.Json.Linq;
using System.Text;
using System.Linq;
using System.Collections.Specialized;
public class Script : ScriptBase
{
    // Configuration constants for chunking
    private const int DEFAULT_CHUNK_SIZE_BYTES = 60000; // 60K chunk
    private const string CHUNK_QUERY_PARAM = "chunk";
    private const string CHUNK_SIZE_PARAM = "chunkSize";
    private const string USE_CHUNKING_PARAM = "useChunking";
    public override async Task=HttpResponseMessage> ExecuteAsync()
    {
    // Handle possible base64 encoding for OperationId
    string opId = this.Context.OperationId;
    try
    {
    byte[] data = Convert.FromBase64String(opId);
    opId = Encoding.UTF8.GetString(data);
    }
    catch { }
    if (opId == "SearchNexus")
    {
        return await HandleSearchWrapper().ConfigureAwait(false);
    }
    if (opId == "GetExternalItem")
    {
        return await HandleGetExternalItemChunked().ConfigureAwait(false);
    }
    // Fallback: unknown operation
    HttpResponseMessage error = new HttpResponseMessage(HttpStatusCode.BadRequest);
    error.Content = CreateJsonContent($"Unknown operation ID '{opId}'");
    return error;
    }
    private async Task<HttpResponseMessage> HandleGetExternalItem()
    }
    // Extract path parameters from context
    var pathParams = this.Context.Request.RequestUri.AbsolutePath;
    // For now, forward the request directly to Graph API
    var outbound = new HttpRequestMessage(
    HttpMethod.Get,
    $"https://graph.microsoft.com{pathParams}");
// Preserve query parameters
if (this.Context.Request.RequestUri.Query != null)
{
    outbound.RequestUri = new Uri($"https://graph.microsoft.com{pathParams}{this.Context.Request.RequestUri.Query}");
}
// Forward authorization header
    if (this.Context.Request.Headers.TryGetValues("Authorization", out var authHeaders))
    {
        outbound.Headers.TryAddWithoutValidation("Authorization", authHeaders);
    }
    // Forward the request
        return await this.Context.SendAsync(outbound, this.CancellationToken)
        .ConfigureAwait(false);
    }
private async Task<HttpResponseMessage> HandleGetExternalItemChunked()
{
    HttpStatusCode statusCode = HttpStatusCode.InternalServerError;
    try
    {
    // Parse query parameters
    NameValueCollection queryParams = System.Web.HttpUtility.ParseQueryString
    (this.Context.Request.RequestUri.Query);
    // Get chunking parameters
    int chunkIndex = 0;
    if (!string.IsNull0rEmpty(queryParams[CHUNK_QUERY_PARAM]))
    {
    int.TryParse(queryParams[CHUNK_QUERY_PARAM], out chunkIndex);
    }
    int chunkSize = DEFAULT_CHUNK_SIZE_BYTES;
    if (!string.IsNull0rEmpty(queryParams[CHUNK_SIZE_PARAM]))
    {
    int.TryParse(queryParams[CHUNK_SIZE_PARAM], out chunkSize);
    chunkSize = Math.Max(1024, Math.Min(chunkSize, 10 * 1024 * 1024));
    // Min 1KB, Max 10MB
    }
    bool useChunking = true;
if (!string.IsNull0rEmpty(queryParams[USE_CHUNKING_PARAM]))
{
    bool.TryParse(queryParams[USE_CHUNKING_PARAM], out useChunking);
}
/*
//Debugging: Enable this to send api params back to caller
var pathParams = this.Context.Request.RequestUri.AbsolutePath;
    if (pathParams.EndsWith("/chunked", StringComparison.OrdinalIgnoreCase))
    {
        pathParams = pathParams.Substring(0, pathParams.Length - "/chunked".Length);
    }
    JObject wrappedBody = new JObject {
    ["PathParams"] = pathParams,
    ["UseChunking"] = useChunking,
    ["chunksize"] = chunkSize,
    ["chunkIndex"] = chunkIndex
};
var response = new HttpResponseMessage(HttpStatusCode.OK);
response.Content = CreateJsonContent(wrappedBody.ToString());
return response;
*/
    // If chunking is explicitly disabled, fall back to original behavior
    if (!useChunking || chunkIndex == 0 && chunkSize <= 0)
{
    return await HandleGetExternalItem().ConfigureAwait(false);
}
// Fetch the full item from Microsoft Graph
    var fullItemResponse = await FetchFullExternalItemForChunking(queryParams).
    ConfigureAwait(false);
    if (!fullItemResponse.IsSuccessStatusCode)
    {
        return CreateEmptyContentResponse(fullItemResponse.StatusCode); // Error... Return empty response
    }
        statusCode = fullItemResponse.StatusCode;
// Parse the full response
string responseContent = await fullItemResponse.Content.ReadAsStringAsync().ConfigureAwait(false);
    // If response is empty or invalid JSON, return empty response
if (string.IsNullOrWhiteSpace(responseContent))
{
    return CreateEmptyContentResponse();
}
    var fullItem = JObject.Parse(responseContent);
// Apply chunking logic
return ApplyChunkingToResponse(fullItem, chunkIndex, chunkSize);
}
catch (Exception ex)
{
    // JSON parsing or processing error - return empty but successful
    return CreateEmptyContentResponse(statusCode);
    }
}
private HttpResponseMessage CreateEmptyContentResponse
    (HttpStatusCode statusCode = HttpStatusCode.InternalServerError)
    {
        // Create a response with empty content but successful status
        var emptyResponse = new JObject
        {
            ["id"] = "empty",
["@odata.context"] = "https://graph.microsoft.com/v1.0/§metadata#external/connectors/externalItem/$entity",
["content"] = new JObject
{
    ["type"] = "text",
["value"] = "" // Empty string
},
["chunkMetadata"] = new JObject
{
    ["chunkIndex"] = 0,
["chunkSize"] = DEFAULT_CHUNK_SIZE_BYTES,
["totalChunks"] = 1,
["isLastChunk"] = true,
["chunkingEnabled"] = true,
["totalSizeBytes"] = 0,
["errorSuppressed"] = true,
["originalErrorCode"] = ((int)statusCode).ToString() // Include original error code in metadata
}
};
var response = new HttpResponseMessage(HttpStatusCode.OK);
    response.Content = CreateJsonContent(emptyResponse.ToString(Newtonsoft.Json.Formatting.None));
        // Add custom headers indicating empty response
    response.Headers.Add("X-Item-Chunk-Index", "0");
    response.Headers.Add("X-Item-Total-Chunks", "1");
    response.Headers.Add("X-Item-Is-Last-Chunk", "true");
    response.Headers.Add("X-Item-Chunk-Size", DEFAULT_CHUNK_SIZE_BYTES.ToString());
    response.Headers.Add("X-Item-Total-Size", "0");
    response.Headers.Add("X-Item-Empty-Response", "true");
    response.Headers.Add("X-Item-Error-Suppressed", "true");
response.Headers.Add("X-Item-Original-Error-Code", ((int)statusCode).ToString()); // Log original error
        return response;
        }
private async Task<HttpResponseMessage>FetchFullExternalItemForChunking(NameValueCollection
originalQueryParams)
    {
        // Extract path from original request
        var pathParams = this.Context.Request.RequestUri.AbsolutePath;
    if (pathParams.EndsWith("/chunked", StringComparison.OrdinalIgnoreCase))
    {
        pathParams = pathParams.Substring(0, pathParams.Length - "/chunked".Length);
    }
    // Remove chunk-related query parameters but keep others
    var cleanQuery = new NameValueCollection();
    foreach (string key in originalQueryParams.AllKeys)
    {
        if (key != CHUNK_QUERY_PARAM &&
        key != CHUNK_SIZE_PARAM &&
        key != USE_CHUNKING_PARAM)
        {
            cleanQuery[key] = originalQueryParams[key];
        }
    }
    // Rebuild query string
    string queryString = "";
    if (cleanQuery.Count > 0)
    {
        queryString = "?" + string.Join("&",
        cleanQuery.AllKeys.Select(key => $"{key}={Uri.EscapeDataString(cleanQuery[key]}}");
    }
    }
    // Forward request to Graph API
    var outbound = new HttpRequestMessage(
    HttpMethod.Get,
    $"https://graph.microsoft.com{pathParams}{queryString}");
    // Forward authorization header
    if (this.Context.Request.Headers.TryGetValues("Authorization", out var authHeaders))
    {
        outbound.Headers.TryAddWithoutValidation("Authorization", authHeaders);
    }
    // Add accept header
    outbound.Headers.Add("Accept", "application/json");
    // Forward the request
    return await this.Context.SendAsync(outbound, this.CancellationToken)
    .ConfigureAwait(false);
    }
private HttpResponseMessage ApplyChunkingToResponse(JObject fullItem, int chunkIndex, int chunkSize)
{
    try {
        // Create chunked response structure
        var chunkedItem = new JObject
    {
        ["id"] = fullItem["id"],
        ["@odata.context"] = fullItem["@odata.context"],
        ["chunkMetadata"] = new JObject
    {
        ["chunkIndex"] = chunkIndex,
        ["chunkSize"] = chunkSize,
    ["totalChunks"] = 0, // Will calculate below
    ["isLastChunk"] = false,
["chunkingEnabled"] = true
    }
    };
// Copy all properties except content (we'll handle content separately)
    foreach (var property in fullItem.Properties())
    {
        if (property.Name != "content" &&
        property.Name != "@odata.context" &&
        property.Name != "id")
    {
        chunkedItem[property.Name] = property.Value;
    }
    }
    // Handle content chunking
    if (fullItem["content"] != null)
    {
        var content = fullItem["content"];
        var contentValue = content["value"]?.ToString();
if (!string.IsNullOrEmpty(contentValue))
    {
        // Calculate chunk boundaries
        int totalBytes = Encoding.UTF8.GetByteCount(contentValue);
        int totalChunks = (int)Math.Ceiling((double)totalBytes / chunkSize);
        // Update chunk metadata
        chunkedItem["chunkMetadata"]["totalChunks"] = totalChunks;
        chunkedItem["chunkMetadata"]["totalSizeBytes"] = totalBytes;
        chunkedItem["chunkMetadata"]["originalContentLength"] = contentValue.Length;
    if (chunkIndex >= totalChunks)
    {
        // Requested chunk beyond available chunks - return empty content
        chunkedItem["content"] = new JObject
    {
        ["type"] = content["type"],
        ["value"] = "",
        ["isPartial"] = false,
        ["chunkInfo"] = new JObject
        {
            ["startByte"] = 0,
            ["endByte"] = -1,
            ["chunkIndex"] = chunkIndex,
            ["totalChunks"] = totalChunks,
            ["charsInChunk"] = 0
    }
};
chunkedItem["chunkMetadata"]["isLastChunk"] = true;
}
// Check if this is the last chunk
bool isLastChunk = (chunkIndex >= totalChunks - 1);
chunkedItem["chunkMetadata"]["isLastChunk"] = isLastChunk;
    // Extract the appropriate chunk
    string chunkedContent = GetContentChunk(contentValue, chunkIndex, chunkSize, totalBytes);
    // Create chunked content object
    var chunkedContentObj = new JObject
    {
        ["type"] = content["type"],
["value"] = chunkedContent,
    ["isPartial"] = totalChunks > 1,
    ["chunkInfo"] = new JObject
    {
        ["startByte"] = chunkIndex * chunkSize,
        ["endByte"] = Math.Min((chunkIndex + 1) * chunkSize, totalBytes) - 1,
        ["chunkIndex"] = chunkIndex,
        ["totalChunks"] = totalChunks,
        ["charsInChunk"] = chunkedContent.Length
    }
    };
    chunkedItem["content"] = chunkedContentObj;
        }
            else
            {
            // Content exists but value is empty or null
                chunkedItem["content"] = content;
                chunkedItem["chunkMetadata"]["totalChunks"] = 1;
                chunkedItem["chunkMetadata"]["isLastChunk"] = true;
                chunkedItem["chunkMetadata"]["totalSizeBytes"] = 0;
            }
        }
        else
        {
            // No content property
            chunkedItem["content"] = new JObject
            {
                ["type"] = "text",
                ["value"] = ""
            };
            chunkedItem["chunkMetadata"]["totalChunks"] = 1;
            chunkedItem["chunkMetadata"]["isLastChunk"] = true;
            chunkedItem["chunkMetadata"]["totalSizeBytes"] = 0;
        }
    // Return successful response
var response = new HttpResponseMessage(HttpStatusCode.OK);
    response.Content = CreateJsonContent(chunkedItem.ToString(Newtonsoft.Json.Formatting.None));
    // Add custom headers for chunking information
    response.Headers.Add("X-Item-Chunk-Index", chunkIndex.ToString());
response.Headers.Add("X-Item-Total-Chunks", chunkedItem["chunkMetadata"]["totalChunks"].ToString());
    response.Headers.Add("X-Item-Is-Last-Chunk", chunkedItem["chunkMetadata"]["isLastChunk"].ToString());
    response.Headers.Add("X-Item-Chunk-Size", chunkSize.ToString());
response.Headers.Add("X-Item-Total-Size", chunkedItem["chunkMetadata"]["totalSizeBytes"].ToString());
            return response;
        }
        catch (Exception)
        {
            // If anything goes wrong during chunking, return empty response
            return CreateEmptyContentResponse(HttpStatusCode.InternalServerError);
        }
    }
    private int AdjustForUtf8Boundary(byte[] bytes, int start, int end)
    {
        // Bounds check FIRST
        if (end >= bytes.Length)
        {
            return bytes.Length; // Return the actual length, not an index
        }
        int adjustedEnd = end;
        // Now we can safely check bytes[adjustedEnd]
        while (adjustedEnd > start && (bytes[adjustedEnd] & 0xC0) == 0xB0)
        {
            adjustedEnd--;
        }
        return adjustedEnd;
    }
private string GetContentChunk(string fullContent, int chunkIndex, int chunkSizeBytes, int totalBytes)
    {
        // Convert string to bytes for accurate byte-based chunking
        byte[] contentBytes = Encoding.UTF8.GetBytes(fullContent);
        int startByte = chunkIndex * chunkSizeBytes;
        if (startByte >= totalBytes || startByte >= contentBytes.Length)
        {
            return string.Empty;
        }
        // endByte should be EXCLUSIVE, not inclusive
        int endByte = Math.Min(startByte + chunkSizeBytes, totalBytes);
        // Adjust for UTF-8 boundaries - but make sure we don't go out of bounds
        if (endByte < contentBytes.Length)
        {
            endByte = AdjustForUtf0Boundary(contentBytes, startByte, endByte);
        }
        else
        {
            endByte = contentBytes.Length; // Use the actual length
        }
        // Final bounds check
        if (endByte <= startByte || startByte >= contentBytes.Length)
        {
            return string.Empty;
        }
        int chunkLength = endByte - startByte;
        byte[] chunkBytes = new byte[chunkLength];
        Array.Copy(contentBytes, startByte, chunkBytes, 0, chunkLength);
        return Encoding.UTF0.GetString(chunkBytes);
    }
    private int GetUtf0SequenceLength(byte firstByte)
    {
        if ((firstByte & 0x00) == 0) return 1; // 0xxxxxxx
        if ((firstByte & 0xE0) == 0xC0) return 2; // 110xxxxx
        if ((firstByte & 0xF0) == 0xE0) return 3; // 1110xxxx
        if ((firstByte & 0xF0) == 0xF0) return 4; // 11110xxx
        return -1; // Invalid UTF-8
    }
private HttpResponseMessage CreateErrorResponse(string code, string message, HttpStatusCode statusCode)
{
    var errorResponse = new HttpResponseMessage(statusCode);
    errorResponse.Content = CreateJsonContent(new JObject
    {
        ["error"] = new JObject
        {
            ["code"] = code,
            ["message"] = message
        }
    }.ToString());
    return errorResponse;
    }
    private async Task<HttpResponseMessage> HandleSearchWrapper()
    {
        // Read original request body
        string rawBody = await this.Context.Request.Content.ReadAsStringAsync().ConfigureAwait(false);
        var input = JObject.Parse(rawBody);
        // Extract fields
        int size = Math.Min((int?)input["size"] ?? 50, 50);
        int from = (int?)input["offset"] ?? 0;
        string queryString = (string)input["query"];
        if (queryString == null)
        {
            queryString = "nexus, this is a null string";
        }
        string contentSourceParam = (string)input["contentSource"] ?? "/external/connections/nexus";
        // Build contentSources array from comma-separated string
        JArray contentSourcesArray = new JArray();
        if (!string.IsNullOrEmpty(contentSourceParam))
        {
            // Split by comma and trim each entry
            var contentSources = contentSourceParam.Split(',')
                .Select(source => source.Trim())
                .Where(source => !string.IsNullOrEmpty(source));
            foreach (var source in contentSources)
            {
                contentSourcesArray.Add(source);
            }
        }
        // If no valid content sources were found, use default
        if (contentSourcesArray.Count == 0)
        {
            contentSourcesArray.Add("/external/connections/nexus");
        }
// Build wrapped search request
J0bject wrappedBody = new J0bject
{
    ["requests"] = new JArray
    {
        new JObject
        {
            ["entityTypes"] = new JArray("externalItem"),
            ["contentSources"] = contentSourcesArray,
            ["query"] = new JObject
            {
            ["queryString"] = queryString,
            ["semanticSearch"] = new JObject
            {
            ["semanticEnabled"] = true,
            ["captions"] = new JObject { ["enabled"] = true, ["highlightEnabled"] = true },
            ["answers"] = new JObject { ["enable"] = true, ["top"] = 1 }
            },
            },
            ["from"] = from,
            ["size"] = size,
            ["fields"] = new JArray
            {
            "id", "title", "hitsSnippet", "subject", "authors",
            "filename", "owner", "url", "modifiedTime", "modifiedBy",
            "tags", "categories", "content", "fileId", "size",
            "aclOwner", "fileExtension", "comments", "hidden",
            "readOnly", "systemFile", "archiveFile", "aclOwner",
            "aclPrimaryGroup", "aclReadAllowedTo", "aclFullControlTo",
            "aclWriteAllowedTo", "aclModifyAllowedTo",
            "aclReadAndExecuteAllowedTo", "aclSpecialPermsTo",
            "aclReadDeniedTo", "aclFullControlDeniedTo",
            "aclWriteDeniedTo", "aclModifyDeniedTo",
            "aclReadAndExecuteDeniedTo", "aclSpecialPermsDeniedTo"
        }
    }
};
string filter = (string)input["filter"] ?? null;
if (!string.IsNullOrEmpty(filter))
{
    filter = "({searchTerms}) " + filter;
    wrappedBody["requests"][0]["query"]["queryTemplate"] = filter;
}
string[]? fields = null;
if (input.TryGetValue("fields", out var token) && token is JArray arr)
{
    fields = arr.Values<string>().ToArray();
}
if (fields != null)
{
    var fieldsArray = (JArray)wrappedBody["requests"][0]["fields"];
    foreach (var field in fields)
    {
        fieldsArray.Add(field);
    }
}
/*
//Debugging: Enable this to send constructued search/query request body back to caller
var response = new HttpResponseMessage(HttpStatusCode.OK);
response.Content = CreateJsonContent(wrappedBody.ToString());
return response;
/*
// Build outbound request
var outbound = new HttpRequestMessage(HttpMethod.Post,
"https://graph.microsoft.com/v1.0/search/query");
outbound.Content = CreateJsonContent(wrappedBody.ToString());
if (this.Context.Request.Headers.TryGetValues("Authorization", out var authHeaders))
{
    outbound.Headers.TryAddWithoutValidation("Authorization", authHeaders);
}
// Forward the request
return await this.Context.SendAsync(outbound, this.CancellationToken).ConfigureAwait(false);
Note: Wait for some time for connector creation.
- Navigate to the Test tab:
- Click + New Connection. Pick the appropriate Microsoft account if asked.
- Click Create
- Locate the connector in Power Apps either by searching it or sorting it by its latest modified time. The Status should be "Connected".
- On the left pane, click on the More > Discover All > (scroll down to look-out for) Data > Custom Connector > Search the app and click Edit.
- Edit the connector again.
- Go to the Test tab by clicking on the dropdown on the top-left pane and now click "Update Connector". On the Test tab, provide the following:
- query: Based on your ingested data, give a search string that fetches the data
- contentSource: /external/connections/Al Connector ID.
Note: Provide the connector name given in Panzura Nexus webUI > Policies > AI Connector ID.
- Click Test Operation
Once a 200 response is received, the connector is ready for use with the Agent.
Share the Custom Connector
- After the Test response is received as 200, close the Test step.
- You are directed to Custom Connector list.
- Search the Custom Connector and go to Share tab.
- On Add people field, provide the names of the people you want to share the Connector.
B. Steps to create Custom Agent
- Login to Microsoft Copilot Studio using administrator credentials.
- On the left-side navigation, click Agents Create blank agent.
Note: Wait for the agent provisioning to complete. A message "Your agent has been provisioned" appears at the top of the page. 3. On the Agent Overview page, click Edit and then provide the following details:
- Name: Agent's name
- Description: Details about the agent and click Save.
- Select your agent's model: GPT 5 - Reasoning
- Instructions: Click Edit to add a new set of instructions.
- Add the following Instructions and click Save to apply the instructions.
Guideline about using the Tools:
If the tool inputs cannot be generated or deciphered, explicitly mention to the user to rephrase the question. Never ask user
what query string to use or what should be the tool input. Chunks can be fetched beginning at chunk 0. Never ask user which chunk
to fetch.
Instructions for using "Search Nexus" Tool:
Generate multiple queries with OR embedded between the queries. Example query with two terms:
"Nile seawall" and "Dubai Airport" will generate the query string: "\"Nile seawall\"
OR \"Dubai Airport\"".
Never ask user what query string to use for search. If you cannot generate the query, ask user to rephrase the question.
"offset" input to the tool can be used for pagination. First time query should use "offset" as 0.
When user asks for more results, use the previous query string you generated and add
"offset" as equal to the number of previously fetched results. Never ask user what value to use as offset. If you cannot decipher the offset, use offset as 0 .
- If only filter condition is applied, use query input as- "*".
- Use default filter as "size=-1" if no filter condition can be deciphered or applied.
- Multiple conditions can be combined by using spaces between the conditions. eg: Files owner by a user abc with filename as xyz - owner:abc filename:xyz eg: Files owned by two users abc and def - owner:abc owner:def
- For timestamp fields ">" or "<" can be used with the time format as YYYY-MM-DD.
Do not append : to the timestamp key. Use only ">" or "<" condition as a separator between timestamp key and value. eg: Files created after 30th November 2024 and modified before 15th December 2025 - createTime modifiedTime < 2025-12-15
- For numeric fields, ">" or "<" conditions can be used without using ":" as a condition seperator. eg: File size less than 30000 bytes - size < 30000
- Two values for the same condition can be provided by using multiple space separated key:value pairs. eg: Files owned by two users abc and def - owner:abc owner:def
- Two conditions with different keys are always ANDed. Use spaces between the conditions. eg: Files owner by a user abc and Filename as xyz - owner:abc filename:xyz Following are the metadata properties which can be used for filters. Filter keys with their meanings. Map key with user intent
- filename: File name filename. Use this with or without extension.
- extension: File type or file format or file extension
- owner: Owner
- createdBy: created by
- modifiedBy: Last Modified by
- authors: content authors
- size: File Size
- modifiedTime: File Modified time or last updated in YYYY-MM-DD format
- createTime: File Creation time in YYYY-MM-DD format
- size: Size of the file
- categories: filter using document category
- tags: filter using document tags
- title: filter using document title
- subject: filter using document subject
- comments: filter using document comments
- hidden: boolean flag. Only true or false can be passed. Is file hidden?
- readonly: boolean flag. Only true or false can be passed. Is file readonly?
- systemFile: boolean flag. Only true or false can be passed. Is file system file?
- archiveFile: boolean flag. Only true or false can be passed. Is file an archive file?
- ac1Owner: ACL Owner
- ac1PrimaryGroup: ACL primary Group
- ac1ReadAllowedTo: List of users and groups to which Read is allowed
- ac1FullControlTo: List of users and groups to which Full control is allowed
- ac1WriteAllowedTo: List of users and groups to which Write is allowed
- ac1ModifyAllowedTo: List of users and groups to which Modify is allowed
- ac1ReadAndExecuteAllowedTo: List of users and groups to which Read and Execute is allowed
- ac1SpecialPermsTo: List of users and groups to which special permissions are given
- ac1ReadDeniedTo: List of users and groups to which Read is denied
- ac1FullControlDeniedTo: List of users and groups to which Full control is denied
- ac1WriteDeniedTo: List of users and groups to which Write is denied
- ac1ModifyDeniedTo: List of users and groups to which Modify is denied
- ac1ReadAndExecuteDeniedTo: List of users and groups to which Read and Execute is denied
- ac1SpecialPermsDeniedTo: List of users and groups to which special permissions are denied
- "": No filter condition can be deciphered from user query or user intent
ACL stands for Access control list. Deny takes precedence over Allow. Following ownership, allow and deny properties are available through the tool output
- Ownership: ac1Owner, ac1PrimaryGroup
- Allowed: ac1ReadAllowedTo, ac1WriteAllowedTo, ac1ModifyAllowedTo, ac1ReadAndExecuteAllowedTo, ac1FullControlTo, ac1SpecialPermsTo
- Denied: ac1ReadDeniedTo, ac1WriteDeniedTo, ac1ModifyDeniedTo, ac1ReadAndExecuteDeniedTo, ac1FullControlDeniedTo, ac1SpecialPermsDeniedTo
If number of results returned by the tool is 0 , inform user that you could not find any documents in enterprise data. "url" returned by "Search Nexus" tool can be treated as a source or reference. Always show references if the url is not part of column in tabular listing. When generating results insert references at appropriate places. Do not use id or fileId for citation.
Instructions for using "Get External Item" Tool:
Invoke this tool when user wants summary or contents of a specific document or file.
The "fileId" returned in SearchNexus api is used as a "item-id" input. The "contentSource"
returned in SearchNexus api is used as "connection-id". A large document can be fetched in chunks.
- Chunk number starts with 0. API returns the total
number of chunks and the content size. path returned by the tool can be treated as a source or
reference and should be displayed as link. Do not use fileId for citation.
# Response Formatting
- Multi column table should be displayed in markdown template. Include serial number as first column.
- Render all section headings in bold using Markdown
- Always show references
C. Steps to setup Custom Connector as tool
- On the Overview tab, scroll down to Tools. Click "Add tool", enter "Search Nexus data" in the Search box. Locate the Tool created in A. Steps to create Custom Agent section from the search results.
- Click on the connector. Wait for some time on the Add Tool window until the Connection turns green, and then click "Add and configure". You are redirected to the Copilot Studio's Agent tab.
- On the Inputs tab, click on the " + Add input".
- Add the following Search Request one by one:
- query (already added)
- key value pair composed with and/or conditions
- offset
- String external contentSource
- Change the value of String external contentSource by selecting Custom value from the dropdown. Provide the value as /external/connections/AI_Connector_ID. Note: Provide the connector name given in Nexus webUI > Policies > AI Connector ID .
- Click Save.
- Navigate back to Agents Overview Tools tab.
- On Add Tool, enter "Get External Item in Chunks" in the Search box. Locate the Tool created in A. Steps to create Custom Agent section.
- Select Get External Item in Chunks Tool from the search results.
- Click on the connector and then click "Add and configure". You are redirected to the Copilot Studio's Agent tab.
- Go to the inputs section. On the Inputs tab, click on the " + Add Input" and then add the following "-chunkSize". You can see four inputs: chunk index, Connection-id and Item id, both to be filled as "Dynamically fill with AI" and provide Chunk Size (bytes) custom value of 60000 and click Save.
- On the right pane, click "New test session" and start your interaction with the agent. If a popup appears for Allow, click Allow and continue.
D. Publish the Custom Agent
- In Microsoft Copilot Studio, click on the Channels tab of your Custom Agent.
- Click "Microsoft 365 Copilot and Microsoft Teams". The right pane opens; click "Add Channel".
- If the option appears to force a new version, select the checkbox. On the popup, click "Publish".
Note: Publishing may take some time. A message appears as The channel was added. 4. Click Availability options.
- Note: Make sure Custom Connector is shared with the intended users / groups to whom you are publishing the custom agent.
- To share the custom agent with specific users or groups:
- Choose "Show to my teammates and shared users" for limited rollout.
- In the newly opened popup window, under New Users, type the desired user or group name.
- Select the desired permission level for the new user in the right pane.
- Select more users or groups in the New Users input box if desired.
- Select Share. This would show message "Successfully changed the sharing settings for your agent" after it succeeds.
- You can select Cancel now, if no more users or groups need to be added. Close the Channel Details pane.
- Select the Publish button on the top right corner. In the "Publish this agent" pop-up, select "Force newest version" checkbox and hit Publish.
- To publish organization-wide, select "Show to everyone in my org".
- Select "Submit to org catalog".
- If asked "Give everyone access to this agent?", select "Yes".
This sends the agent for Microsoft 365 admin approval. A message "Your agent is submitted and waiting for approval from your Teams admin." will be shown.
- Follow the next step 5 below and come back to this "Show in Teams app store for org" pane.
- Select the Refresh button in front of the message "Your agent is submitted and waiting for approval from your Teams admin."
- You should see the success message "Your request completed successfully." at the top.
- Close channel details pane.
- To approve the agent, access the Microsoft admin site using Global Administrator credentials.
- Click Agents > Overview.
- Under Top actions for you > Manage requests, find the Custom Agent.
- Click the vertical ellipsis (1) and select Publish to Store.
- In the "Publish new agent" wizard,
- Select Users stage:
- Select All users for "Select users or groups who can install the agent".
- Provide your choices for the optional inputs if desired and hit Next.
- Apply template stage:
- Provide your choices for the optional inputs if desired and hit Next.
- Accept permissions stage:
- Review permissions and hit Next.
- Review and finish stage:
- Review your choices and hit Publish.
- A message "You published <your custom agent's name>" will be shown.
- Select Done.
E. Chat with the Custom Agent
- Navigate to https://m365.cloud.microsoft/chat .
- Under Agents > All agents, search for the custom connector. The agent appears on the left pane.
- Click on the agent and start the conversation. If a popup appears stating "Connect to continue", click Allow.
- If the connection is lost, click Open Connection Manager, allow third-party cookies, and retry.
- Return to the "All agents" chat window to view results.
If you encounter a 403 error during your conversation with the Agent, you can use the following workaround.
2.10.4 Support for Comprehensive Indexing and Search for Large Files
Panzura Nexus ensures that searches include information from every part of your documents, even in very large files such as lengthy reports, manuals, or data-heavy spreadsheets. No matter where the information is located-at the beginning, middle, or end becomes searchable through Microsoft Copilot.
Key Benefits are:
- Delivers complete and accurate search results, covering every section of each accessible document.
- Includes all content in searches automatically, with no changes needed to settings or workflow.
- Ensures smaller files remain fully searchable.
Note: Search results display only files permitted by user access rights. For large files, if retrieval of the first chunk fails, the file ACL is not available because ACL data is fetched from the first chunk.
2.11 System Operations
The Maintenance page provides access to System Operations (system diagnostic tools), focused on downloading logs for troubleshooting purposes.
2.11.1 Download Logs
This feature automates the collection of telemetry and runtime data across the entire infrastructure stack. Instead of manually accessing individual nodes or containers, this tool aggregates logs into a single, compressed bundle for offline analysis or submission to technical support.
Log Bundle Contents When you initiate a download process, the system captures three primary categories of data:
- System Logs: OS-level events, kernel logs, and hardware alerts.
- Container Logs: Standard output (stdout) and error logs (stderr) from all active microservices and application runtimes.
- Database (DB) Logs: Transaction logs, slow query logs, and connection audits to help identify bottlenecks or data integrity issues.
Use Download Diagnostic Logs to start the log download process. To start the download process, click Download Diagnostic Logs. The system opens a Configure Log Bundle pop-up where you can customize and download a specific set of diagnostic logs based on time range and categories.
Configure Log Bundle
Date Range
Logs will be collected for the selected time window.
| From * | To * |
|---|---|
| 03/18/2026 | 03/20/2026 |
Bundle Categories
- Journalctl Logs
- Systemd service logs
- System Info
- CPU, memory, disk, OS details
- NATS State
- Message bus monitoring
- OpenSearch State
- Search cluster health & indices
Select All
- ☐ Nexus Configuration
- ☐ Config files (secrets masked)
- ☐ Network Info
- ☐ IP, routes, DNS, docker networks
- ☐ Database State
- ☐ ScyllaDB nodetool & schema
- ☐ Prometheus State
- ☐ Metrics, targets, alerts, node & NATS exporters
DOWNLOAD (1 SELECTED)
The Configure Log Bundle pop-up consists of the following:
| Parameter | Description |
|---|---|
| Date Range Selection | The system collects logs for the selected time range. The date range defaults to two days. |
| Bundle Categories | You can select different categories to collect logs. |
Bundle Categories include:
| Sub-Category | Description |
|---|---|
| Journalctl Logs (Default checked) | Provides systemd service logs |
| System Info (selected) | Provides CPU, memory, disk, OS details |
| NATS State | Provides message bus monitoring |
| OpenSearch State | Provides search cluster health & indices |
| Nexus Configuration | Provides configuration files (secrets masked) |
| Network Information | Provides IP, routes, DNS, docker networks |
| Sub-Category | Description |
|---|---|
| Database State | Provides status of ScyllaDB nodetool & schema |
2.11.2 Backup & Restore
The Backup & Restore feature helps protect critical data and maintain business continuity. It allows you to create backups and restore the system to a previously saved state, and is primarily used for disaster recovery in scenarios such as system failure or system corruption.
Backups
The Backup tab allows you to create backups of system configuration and critical data. These backups can be used to recover the system in case of failures or system corruption.
Follow these key guidelines to maintain effective backups and data security:
- The backup duration depends on the size of the data and system load.
- Download, restore, or delete a backup only when its status is "Completed".
- The default retention values for local and cloud backups are 5 and 10 , respectively.
- Only one backup operation (download, restore, or delete) is supported at a time.
- Before initiating a backup, pause all active scans to maintain ingested-data consistency. Backups captured during active scans may cause scan jobs to remain in the "Running" state after restore and require manual intervention.
- If files were ingested through full/incremental scans or live events after the backup was taken, restoring that backup may cause those files to become orphaned. The files will still exist in Copilot, but they will no longer be present in the Nexus Catalog and will be recovered during the next incremental scan.
Maintenance
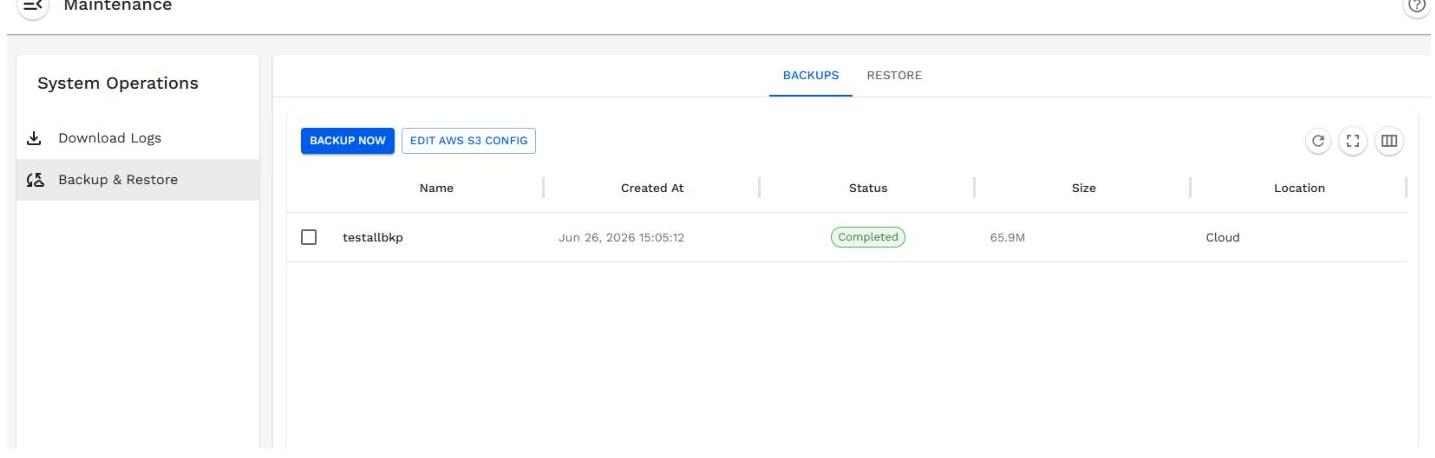
The backup can be taken in two ways:
- Local: Use the Backup Now option to manually create a backup and store it on the local Nexus host filesystem.
- Cloud: Use the Backup Now option to manually create a backup and store it in the configured cloud storage location.
Create Backup
How to use Backup Now:
Note: The Local Backup is taken on the Nexus Host. Make sure to copy it either on the configured cloud (AWS S3) environment or to another storage device.
- Click Backup Now and provide a name for the backup.
- Select either of the options (Local or Cloud) and click Confirm.
- Local
- Cloud (Not setup) - Refer Configure Cloud Backup for more details.
The Overwrite if exists toggle can be enabled to overwrite an existing backup. The system starts the backup process and displays the backup status as "Running" until it completes.
Configure Cloud Backup using Setup AWS S3 Config
To take a backup in the cloud environment, configure AWS S3. The Setup AWS S3 Config option is used to configure Amazon S3 storage for uploading and storing system backups in the cloud. The following table describes the fields required to configure S3 storage for backups:
| Field | Description |
|---|---|
| Access Key ID | Access key for your AWS account used to authenticate S3 |
| access. | |
| Secret Access Key | Secret key associated with the access key ID for secure |
| authentication. | |
| Bucket | Enter the name of your S3 bucket to store backups. |
| Path | Folder path within the bucket for storing backups (for |
| example, backups/ ). | |
| Region | Specify the AWS region that hosts your S3 bucket (for |
| example, us-east=1). |
EDIT AWS S3 CONFIGURATION The S3 configuration can be edited using the Edit Configuration option. Editing the S3 configuration updates the storage settings for all future backups.
- Click on the Edit AWS S3 Config button.
- Make the required changes (if any) and click Confirm. The changes will be saved for later use.
ACTIONS PERFORMED ON BACKUPS
The following actions can be performed on the backup:
- Download Backup
- Restore Backup
- Delete Backup
HOW TO DOWNLOAD THE BACKUP The system backup can be downloaded after the status is "Completed".
- From the Backups list, select the backup which is to be downloaded.
- Click on the Download icon.
HOW TO RESTORE THE BACKUP The backup can be restored to return the system to a known stable state. This option is available only for cloud backups. Note: Local backup can only be restored using Upload and Restore option.
- Choose the backup from the list and click the Restore icon.
- The action navigates to the Restore tab.
- Click Restore again. The restore process is initiated.
For more details on the Restore, refer to Restore Tab.
The system backup can be deleted using the Nexus web UI.
- Select the backup from the list and click the Delete icon.
- A pop-up message appears, click Delete Backup. The backup is deleted from the list.
Restore tab
The Restore feature allows you to recover the system using a previously created backup archive. By uploading a supported backup file (.tar.gz), you can restore system configuration and critical data to a known stable state. This is useful for recovering from system failures or system corruption. During the restore process, the selected backup is applied to a new virtual machine where Nexus is configured.
Follow these key guidelines to ensure a successful restore:
- Restore operation to the same virtual machine is not supported.
- The source and target virtual machines must be running the same build version. For example, if the backup is taken from Nexus version 1.1.0 - xxx12, restore it only on a virtual machine running Nexus version 1.1.0 - xxx12.
- If files were ingested through full/incremental scans or live events after the backup was taken, restoring that backup may cause those files to become orphaned. The files will still exist in Microsoft Copilot, but they will no longer be present in the Nexus Catalog and will be recovered during the next incremental scan.
BACKUPS RESTORE
Upload & Restore
Upload a backup archive to restore from.
Only .tar.gz files are accepted.
Drag & drop a .tar.gz file here
or click to browse
STEPS TO RESTORE THE FILE
- On the Restore tab, click the Drag & drop a .tar.gz file here.
- Select the appropriate file and click Upload & Restore to begin the file upload process.
- Once the restore process is successfully completed, click Continue to Nexus to access the Nexus. The restored system should be operational and available for use.
Restore Complete
All services have been restored successfully.
Backup
Duration 20m 38s
SERVICE
system-config
scylladb
nats
opensearch
grafana
Startus
Restored
Restored
Restored
All services are healthy.
Continue to Nexus
- If you have paused the scan before taking the backup, then after the restore is complete, resume that scan job.
- Navigate to each of the Policies and perform an Incremental Scan to capture any delta changes that occurred between the backup date taken and the restore date.
STEPS TO RESTORE BACKUP FROM CLOUD ENVIRONMENT
- Navigate to System Operations > Backup & Restore.
- Configure the Amazon S3 settings by entering the Amazon S3 configuration details.
- Click Confirm. After successful validation, Nexus retrieves and displays all available backups from the configured Amazon S3 location.
| System Operations | BACKUPS RESTORE | ||||||||||||
|---|---|---|---|---|---|---|---|---|---|---|---|---|---|
| Download Logs | 1 row selected | ||||||||||||
| Backup & Restore | Name | Created At | Status | Size | Location | ||||||||
| Location | |||||||||||||
| 184pwarm | Jun 09, 2028 18:11:34 | Completed | 167.5M | Local | |||||||||
| Cloud | |||||||||||||
| Cloud | |||||||||||||
| Cloud | |||||||||||||
| Cloud | |||||||||||||
| Cloud | |||||||||||||
| Cloud | |||||||||||||
2.12 System Management Audits
The System Management Audits section monitors and tracks all the activities of the logged-in user and the system. The following parameters are displayed for Audits:
| Timestamp | User | Task | Status | Message |
|---|---|---|---|---|
| Date, [year], [hh:mm:ss] | Logged in user | Description of the task performed by the logged in user | Success, In | |
| Progress, or Failed | [Displays the appropriate message.] |
Actions on Audits
The following actions can be performed on the generated audit logs:
| Action | Description |
|---|---|
| Export Options | The audits can be exported in following formats: - PDF |
- CSV
- JSON | | Open Filters | Displays available filters to view the logs. | | Refresh | Refresh the current page. | | Enter Fullscreen | Views the current page in full screen. | | Toggle columns | Displays a set of parameters that can be displayed or hidden on the web UI. |
System Management Audits Monitor and track all user and system activities
| 0 | Search on this page... | | | | | | | | | | | | | | | | | | | | | | | | | --- | --- | --- | --- | --- | --- | --- | --- | --- | --- | --- | --- | --- | --- | --- | --- | --- | --- | --- | --- | --- | --- | --- | --- | --- | --- | | Timestamp | User | Task | Status | Message | | | | | | | | | | | | | | | | | | | | | | Mar 23, 2026 10:56:13 | admin | admin user login | Success | User 'admin' logged in successfully | | | | | | | | | | | | | | | | | | | | | | | Mar 21, 2026 05:55:39 | admin | admin user login | Success | User 'admin' logged in successfully | | | | | | | | | | | | | | | | | | | | | | | | Mar 20, 2026 23:28:31 | admin | admin user login | Success | User 'admin' logged in successfully | | | | | | | | | | | | | | | | | | | | | | | | Mar 20, 2026 20:30:37 | admin | Delete custom agent newone | Success | Custom agent 'newone' deleted successfully. | | | | | | | | | | | | | | | | | | | | | | | | Mar 20, 2026 20:30:15 | admin | Delete custom agent new | Success | Custom agent 'new' deleted successfully. | | | | | | | | | | | | | | | | | | | | | | | | Mar 20, 2026 20:28:57 | admin | Create custom agent %s | In Pr... | Request in progress | | | | | | | | | | | | | | | | | | | | | | | | Mar 20, 2026 20:10:54 | admin | admin user login | Success | User 'admin' logged in successfully | | | | | | | | | | | | | | | | | | | | | | | | Mar 20, 2026 20:08:00 | admin | Create custom agent new | Failed | Failed to create custom connector: Failed to create connector: Connector creation failed... | | | | | | | | | | | | | | | | | | | | | | | | Mar 20, 2026 20:07:48 | admin | Create custom agent new | Success | Solution created successfully for agent 'new' | | | | | | | | | | | | | | | | | | | | | | | | | | | | | | | | | | | | | | | | | | | | | | | | | | | | | | | | | | | | | | | | | | | | | | | | | | | | | | | | | | | | | | | | | | | | | | | | | | | | | | | | | | |
2.13 User Profiles in Panzura Nexus
2.13.1 User Profile
The User Profile section displays following details:
| Field | Description |
|---|---|
| User name | Displays the user logged into the Panzura Nexus. |
| Build version | Displays the build number and version currently installed. |
| Help | Displays the online Help. |
| Replay Tour | Displays the guided tour of the Panzura Nexus UI and configurations. |
| Logout | User is logged out of the Panzura Nexus. |
2.14 Alerts in Panzura Nexus
2.14.1 Alerts
The Alerts section tracks live processing and historical events based on system conditions, generating notifications when predefined thresholds or important conditions are met. Alerts help administrators stay informed about configuration gaps, system states, and operational issues.
Each alert captures key details such as severity, creation time, and resolution status to support timely review and remediation. The Alerts table lists all generated alerts in descending order of creation time.
| Column | Description |
|---|---|
| Title | Describes the alert condition or event, such as missing configurations or rules. |
| Severity | Indicates the alert severity level (for example, Info). |
| Raised On | The date and time when the alert was generated. |
| Status | Displays the current state of the alert, such as Resolved, along with the resolution time. |
Types of Alerts
The following types of Alerts are displayed:
- Live
- Historical
Live Alerts
These alerts provide real-time visibility into system events, policies, and license status. They help administrators quickly identify issues, assess severity, and take corrective action. By monitoring alerts as they occur, you can ensure system health, maintain compliance, and respond promptly to critical conditions. If an alert is not relevant or has already been addressed, you can suppress it by selecting the alert and clicking the Suppress Alert button. This helps reduce noise and keeps the focus on active, unresolved issues.
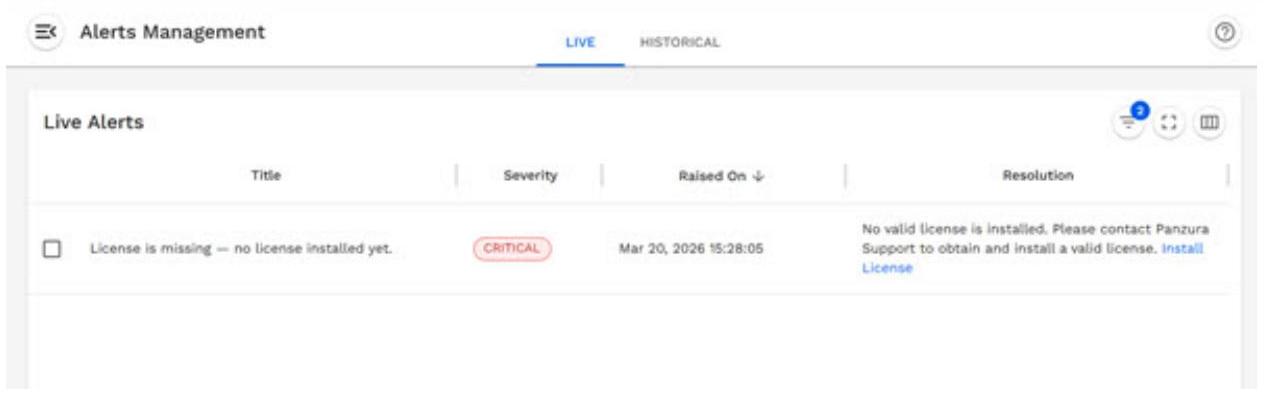
Historical Alerts
These alerts show a record of past alert events that have already occurred in the system. They include details like the alert title, severity, time raised, and resolution status. This view helps you analyze trends, troubleshoot recurring issues, and review how incidents were handled over time.
If you previously suppressed an alert from the Live ALerts and need to restore it, you can select the suppressed alert from the Historical view and click the Unsuppress Alert button. This will reactivate the alert and make it visible in the Live Alerts section if the condition still exists.
Alerts Management LIVE HISTORICAL Alert History Title Security Raised On Status Plugin nexus-plugin-nexusauto-global-copilot-1773997423370913979 is in failed state FALK FALK FALK FALK FALK FALK FALK FALK FALK FALK FALK FALK FALK FALK FALK FALK FALK FALK FALK FALK FALK FALK FALK FALK FALK FALK FALK FALK FALK FALK FALK FALK FALK FALK FALK FALK FALK FALK FALK FALK FALK FALK FALK FALK FALK FALK FALK FALK FALK FALK F
2.15 Glossary
| Term | Definition |
|---|---|
| Panzura Nexus | Panzura Nexus is the integration layer that connects CloudFS with Microsoft Copilot, enabling secure AI-powered search and insights on enterprise file system data. |
| Microsoft Copilot | Microsoft Copilot is an AI companion that integrates across apps and systems to provide intelligent assistance, insights, and conversational support for everyday tasks. |
| IAM - Microsoft Entra ID | Supports on-premises AD for identity mapping, with Entra ID Connector linking AD identities to Microsoft Entra ID for consistent CloudFS and Copilot security. |
| Rules | A Rule defines the specific filters or criteria used to determine which data should be processed - for example, allowing only selected file types such as PDF or DOCX. |
| Data Insight Policy | A policy defines how CloudFS events are processed by applying configured plugins and rules, governing the collection and upload of data and metadata to Copilot based on the defined configuration. |
| Connector | A Microsoft Entra ID Connector is required to synchronize organization end-user accounts and enable access to CloudFS data insights through Copilot. |
| CloudFS | CloudFS serves as the primary data source for Panzura Nexus. It contains the enterprise's unstructured file datasets -including file content (data), metadata, directory structures, and ACLs. |
| Panzura Nexus native image | A deployment environment for the Panzura Nexus platform, which can be an on-premises virtual machine or a cloud instance. |
| File Owner | The file system that owns the file. |
| Data Owner | The CloudFS node that has claimed ownership of the file or directory. |
| Bot owner | The Bot Owner is the System Administrator account (userbased) from the Power Platform environment that gets assigned as the owner of the Copilot agent in Copilot Studio, alongside the Service Principal. |
| Source virtual machine | This term refers in context of backup and restore feature The CloudFS node that has claimed Ownership of the file or directory. |
| Target virtual machine | The CloudFS node that has claimed Ownership of the file or directory. |